
Blyth Railway Station in 'N' gauge
It's all my Dad's fault! From my earliest memories of childhood the main interests have always been railways and football, although a hint at which one of those came out tops can be corroborated by the stories that my late Aunty Rita used to regularly regale anyone with who cared to listen. When we used to visit her in Tooting, London, my Dad and me would play football on Streatham Common, which apparently has a railway embankment running next to it. Every time a train went past (a frequent occurrence in those parts) I'd stop kicking the ball and watch the train until it was out of sight. I'd then go back to kicking the ball until the next train came along, and so the cycle continued until it was time to go.
When we weren't visiting Aunty Rita (a rare treat courtesy of my Dad's pass as a railwayman) we would more usually visit my Mam's sisters and brothers in Leamside and West Rainton, necessitating an exciting railway trip from our home in Blyth to Durham. Early childhood visits would start at Newsham Station on a DMU for Monkseaton or Manors where we would transfer to a third-rail electric train to Newcastle Central and then decant onto a big train for Durham.
On arrival at Durham I would never leave the station until our train had departed over the famous viaduct, and I was always hopeful of an early arrival back at the station so I could watch at least a couple of non-stop services speed through and see the preparation of the evening parcels from Post Office vans on the Up (southbound) platform. By the time we arrived back in Newsham I was usually fast asleep in my Dad's arms - I wonder how many times he had to carry me from the station to our home over half a mile away!
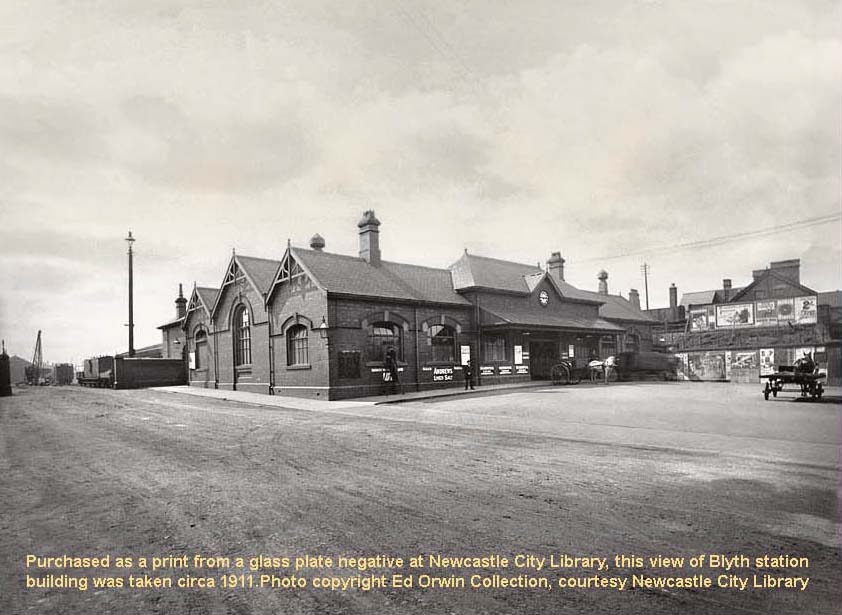
(Above) The first passenger station was opened in 1847 by the Blyth & Tyne railway (B&TR) opposite the Fox and Hounds Hotel in the Cowpen Quay area. Twenty years later a second station was built a few hundred yards west, adjacent to Turner Street. The Blyth & Tyne Railway amalgamated with the North Eastern Railway (NER) in 1874, and in 1892 the NER purchased land for a major expansion of rail facilities. This involved demolition of part of the terraced housing on Catherine Terrace and Edward Street. Three years later the third and final station was opened by the NER on an expanded site next to the second station. This development included construction of a completely new station building, island platform with glazed canopy, goods shed, coaling stage, two signal boxes, water tank, cattle dock, horse-keeper's house, stables, station master's house, turntable and a 3-road engine shed, all of which was completed by local builder Simpson's. In 1908 the NER designed a new side entrance to the main station concourse and the parcels office was modified. Click on photo (above) to view larger image. Footnote: I initially had to guess the year that this photo was taken: it was only in the light of additional information becoming available to me later that I came across architect's plans and the builder's signature that suggested the addition of double doors on the southern side of the building in 1908 or 1909. Hence I now know this photo to be pre-1909....not 1911.
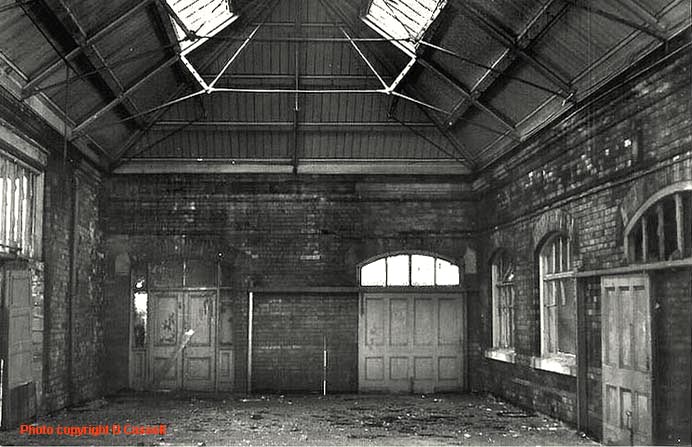
(Above) Fast-forward 60-odd years and vandals official and otherwise have done their worst. On October 31st 1964, the last passenger train to depart from Blyth station was the 11.59pm dmu service to Newsham. The parcels traffic ceased the same day. November 2nd was the actual official closure date to passengers. An appeal to re-instate the passenger service failed and a contractor commenced track removal in the station area using a rail-wheeled Landrover. Work began on demolishing the goods shed, coaling stage, engine shed, water tank and turntable in 1968, leaving the station building extant. However, following a spate of vandalism and attempted arson the local press highlighted the concerns of local residents regarding the safety of the station area, and in February 1972 work was started on demolishing the station buildings, canopy and platform. In the photo (above) the interior of the waiting area is looking decidely worse for wear; on the left of the photo (west) are the sliding doors that gave passenger admittance to the platforms, while on the right (east) the sliding doors provided access though the archway to the main concourse, toilets, waiting rooms, parcels, ticket and Station Manager's offices. The door on the left of the north wall was used by railway staff for access to the adjoining buildings and short platform next to platform 2. The door on the right led to the steps up to the high level line.
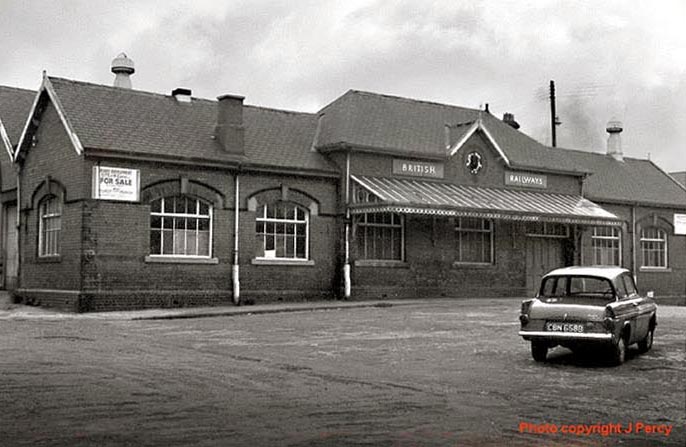
(Below) Joe Percy's photo shows the front of station in 1968. The entrance under the canopy had originally been built in the centre of the building, directly below the clock (see glass plate photo above). This was altered by the LNER in 1930 to allow, amongst other things, the ticket office to be inverted and the adjoining parcels office to be extended. The For Sale sign says: Building Development 4.2 acres Agent's name Storey's (now known as Storey Sons & Parker).
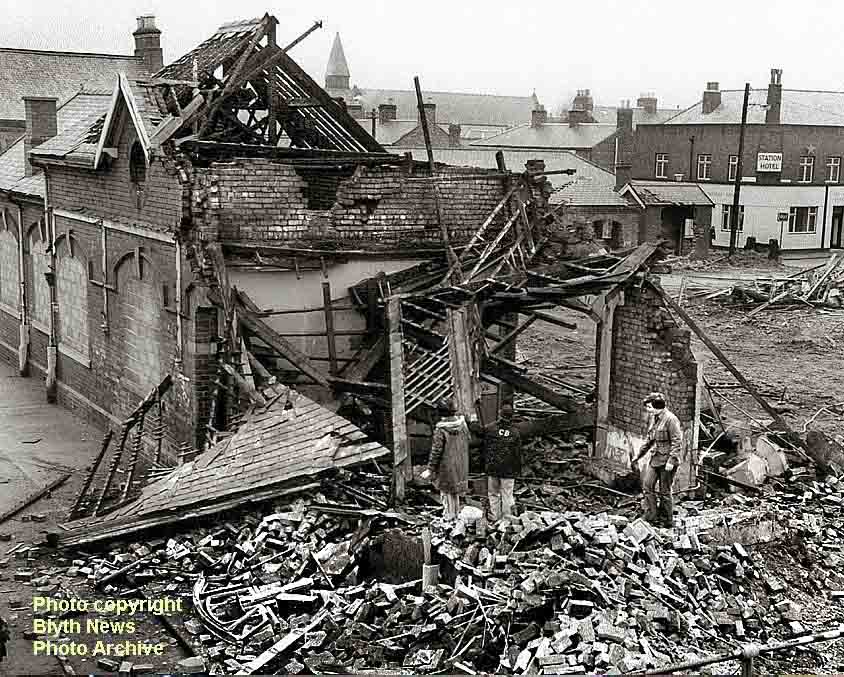
(Above) This 1972 photo shows demolition of the station building and the 'de rigeur' boys' fashion items of the early 1970s, including a donkey jacket originally emblazoned NCB (the N is missing) and a Parka coat. The kids (I wonder where are they now?) are standing on what had been the circulating area created by the LNER alterations of 1930 opposite the ticket office. Prior to that it had been the ticket office. Visible in the right background is the Station Hotel, still standing in 2010 and now a Building Society's branch amongst other things, and the remains of two brick huts. That one on the left was the weighbridge hut - my first scratchbuilt model described below. I'd like to know what the right-hand hut was used for.
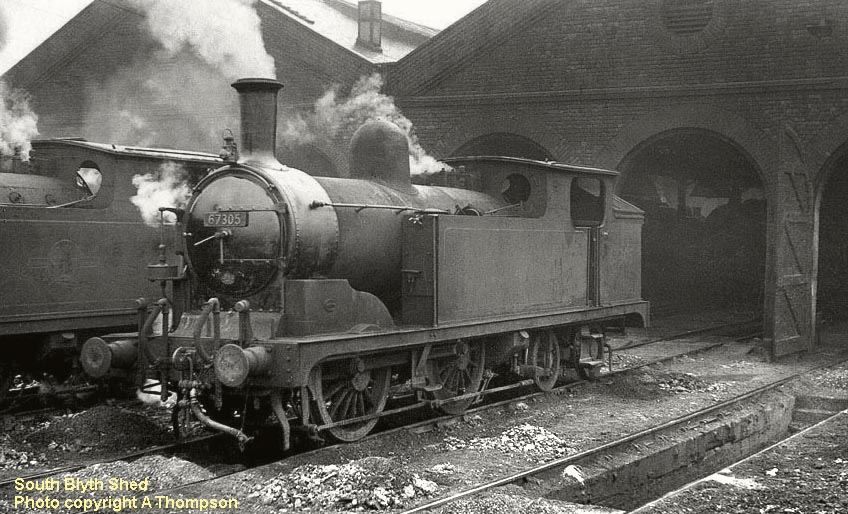
(Below) So far (this page started in April 2010) I have only constructed a temporary balsa model of South Blyth shed. This photo must have been taken between 1956 and 1958 as the G5 on the left has the later style of British Railways totem on the tank side, so it is interesting that shed road 6 still had it's wood doors at that time - as far as I can tell it would have been the only road that did by then! This is useful for me as it allows me to model that road with the doors closed, thus disguising the fact that there will be no space for track for road 6 behind those doors! This is because the shed will be at an angle to the baseboard edge, and therefore will have to be narrower at the rear than at the front. This was a calculated risk when I first determined the width of the baseboards, otherwise I would have had to increase their width to nearly 3', thus making them too wide for loading into a car.
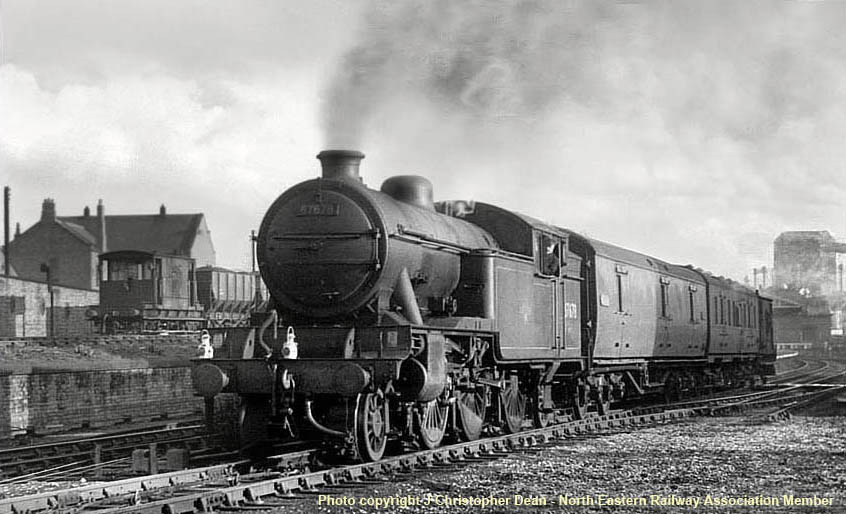
(Above) Until June 1958 the passenger services were ex-North Eastern Railway (NER) G5 0-4-4 tank locos, typically with 2 or 3 ex-NER or Gresley LNER teak non-corridor carriages. Many of these services were 'push-pull' operated, thus avoiding the need for an engine to run round its stock at each end of the short journey from Blyth to Monkseaton. Dieselisation of the passenger services began in 1958, with Metro-Cammell, Park Royal and Derby Lightweight diesel multiple units (DMUs) taking over from steam. The only exception was the parcels service from Blyth and Newbiggin to/from Newcastle which were typically in the hands of Gresley V1/V3 2-6-2T tank locos. Adding to the loco variety at Blyth, No 67678 departs with the Saturday 'up' parcels in September 1963. Photo copyright J Christopher Dean.
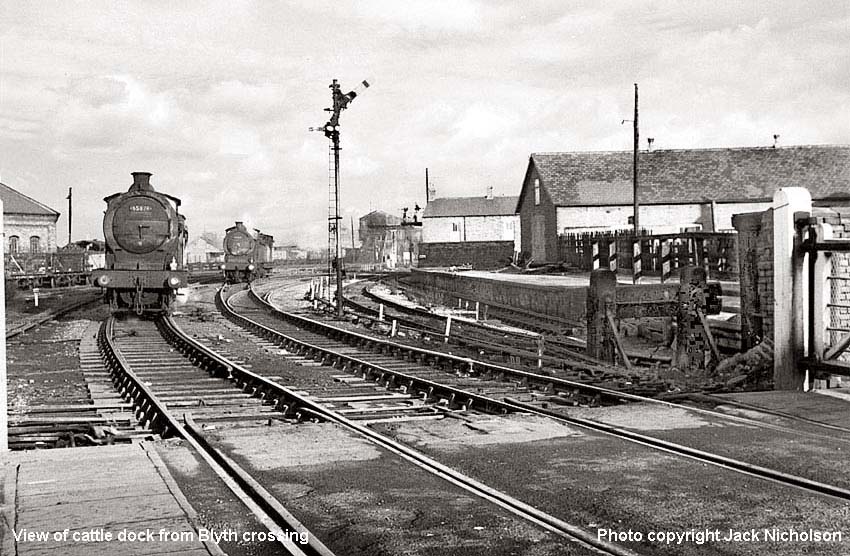
(Below) This is a view of the Cattle Dock from Level Crossing. The cattle dock was used by the visiting circuses for loading and unloading a variety of animals, including elephants. Regular use of the dock ceased in 1958: prior to that it was more commonly used to off-load animals from cattle trucks for the abattoir on Plessey Road, about half a mile away. Behind the dock is a glimpse of the row of 4 terraced houses that were all that remained of Catherine Terrace after the land-mine damage of 1941. These were demolished in the late 1970s. This photo is useful for me as it has details of a building I have very little information for, but holds a lot of memories for ex-railway staff from Blyth: namely South Blyth BRSA Club and the adjoining dance hall. I still do not have enough photographic information on these buildings to enable me to model them with any great degree of accuracy - can anyone help me please? Additionally, the area behind where the photographer was standing (i.e., the other side of the level crossing) had a fairly large building on Renwick Road, adjoining the Up main line to Newsham. This building still stands to this day (latterly Blyth Tool Hire, I'm not sure who rents it now) but has been heavily modified on the ground floor over the years. As it will form the far left-hand end of my layout I would welcome any info anyone can give me on it. Photos of the frontage from any time up to the 1960s would be great.
(Left) The 'N' gauge layout of Blyth station is a huge project - and, of course, ongoing - therefore this page will be frequently updated as I go along, but in order to give visitors some idea of progress, by April 2010 I had laid all the track to the station platforms and goods shed areas, leaving the engine shed area, coaling stage area and the exchange sidings serving the high level line that crossed Turner Street to the shipyard, staiths and gas works yet to be laid. Point motors have been mounted under each point so far installed and these will be fully tested before embarking upon any more tracklaying. In parallel to this I have finished
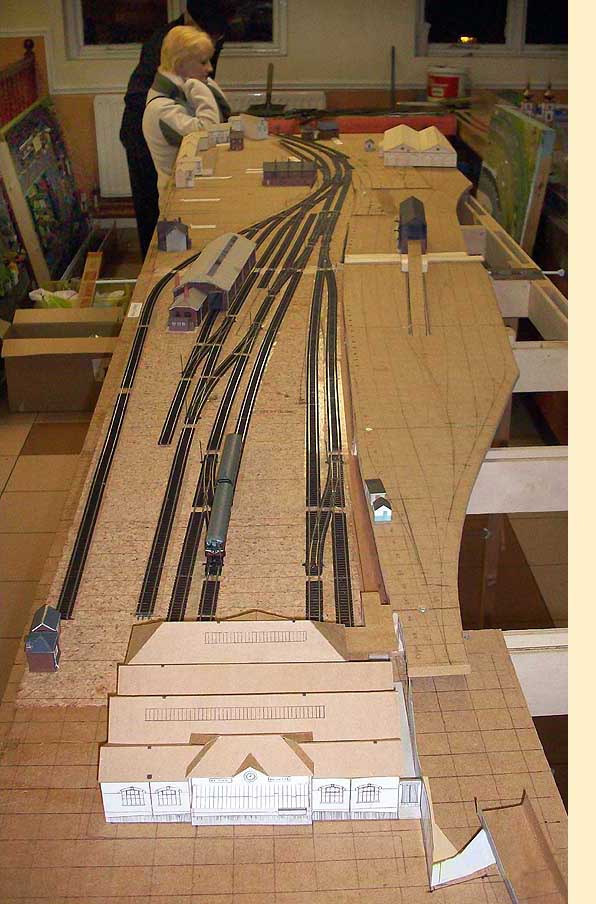 construction of the homemade point control unit and when I'm happy with the electrical side of things I'll ballast the existing track, add platforms and some of the buildings. Hopefully this section of the layout will be in operation in time for the Blyth and District Model Railway Club exhibition in August 2010. As far as model buildings are concerned, I've completed the Station Master's house, a row of terraced houses, coaling stage and sundry huts and offices. However, progress on the station building is ongoing. The construction in the bottom of the photo is a temporary card model, with a similar card model of the bridge over Turner St bottom right. The left-hand side of the layout is the railway's walled border with Delaval Terrace. The two small huts to the left of the station building are those referred to below, and I have all the information necessary to construct the remaining buildings for the layout with the exception of the dance hall and adjacent South Blyth BRSA Club, both of which survived the railway but have now been demolished.
But I'm getting ahead of myself. Returning to childhood days, a combination of Mr Beeching closing the Blyth & Tyne route to passengers in 1964 and me getting older (by then I was over 5 years of age) meant that the nearest local station became Whitley Bay, and a boring bus journey to and from there and Blyth became the norm, although train travel around the North Tyneside Loop still had its benefits even if my Dad would no longer carry me...Dad worked as a Carriage & Wagon Repairer for British Railways, initially at North Blyth MPD but when the shed closed in 1967 he transferred to the new diesel diesel depot at Cambois. I had several unofficial visits to both sheds as well as South Blyth shed just before its closure. Oh how I wish I'd been old enough to have a camera then. Dad retired through ill health in 1977, though not through carrying me, mind you. He died just before Christmas 2005 aged 91 years.
Dad was a dedicated railwayman from joining the LNER in 1947. Born in 1914 he'd previously learned a trade as a carpenter before he became a professional footballer and then in WWII a stretcher bearer in the 51st Highland Division of the Black Watch, serving under Field Marshall Montgomery in the 8th Army at El Alamein before being captured in Italy and becoming a POW. He was a member of St John Ambulance Brigade - even training as a midwife! - remaining in the Army for a couple of years after the War including service at the Army's railway training base at Borden in Hampshire. I remember being taken by Dad several times to North Blyth shed (the one on the other side of the river). This was his workplace and, for me, a wonderful place. I don't think he would have agreed. As a C&W repairer his working life was mainly spent
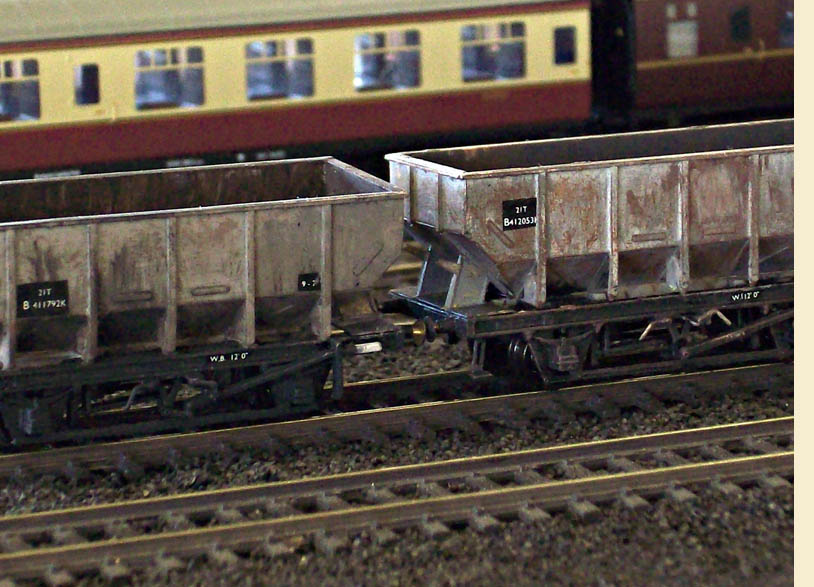 outside in the wind and rain on the cripple sidings, buning out rivets, replacing leaf springs and wheelsets, repairing woodwork to wagons, etc. His only comfort would have been the little cabin he and his C&W mates shared for tea breaks, etc. From memory this was a filthy, wonderfully smelly, dark environment, full of the smell of Woodbines and sweet strong tea. It would have been shut down within a mile of a H&S Manager getting to it today. I don't know how much he earned per week, but it wasn't much. He could earn a bit more on overtime, often through the breakdown crane going out to a derailment somewhere late at night. This could be as far away as Shilbottle, where the line to the colliery would never have won the 'prize length'. I'm sure there's not many people today who'd be prepared to put up with such dire working conditions, particularly as every morning before work, he had an arduous walk of nearly 2 miles to the ferry that would take him, if he was lucky, to West Blyth followed by a further 1 mile walk to Cambois - or, if he was unlucky, to North Blyth which then entailed a 2 mile trek to Cambois usually with an icy cold wind and driving rain straight off the North Sea. He must have silently cursed BRs decision to close North Blyth shed which was situated just behind the staiths and adjacent to the ferry landing.
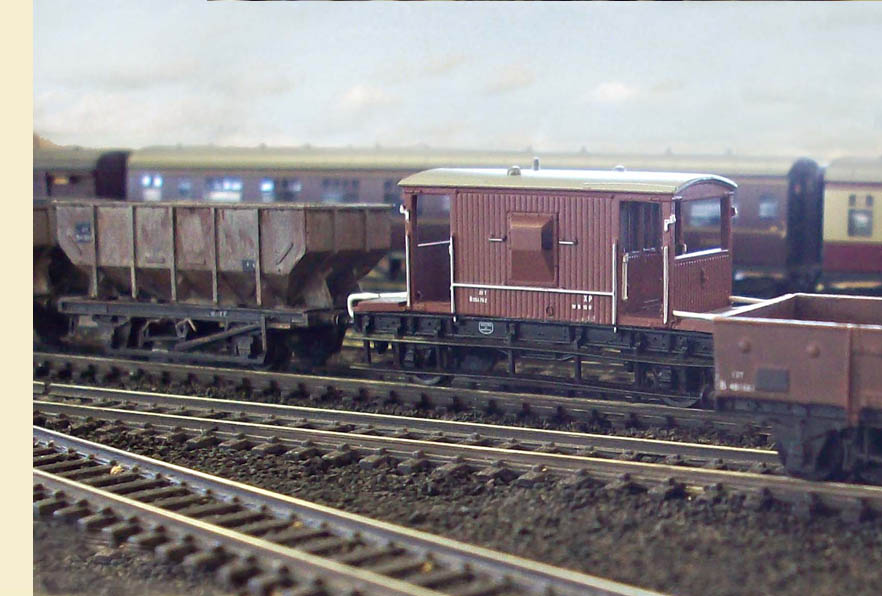 For me the seeds of a lifelong interest in railways had been well and truly sown and nurtured. I'll always have the memory of the big (to an 8 year-old) steam engines, the dirt and, most importantly, the smell of the simmering beasts within the shed. That wonderful oily smoky smell would ingrain itself in everything my Dad wore and carried home every day, including his folded copy of The Journal in his haversack that I would excitedly read from back to front in the hope of reading about the latest news of my favourite football team, Blyth Spartans.
Fast-forward to the early 1990s, and after a few aborted attempts by me to model in both OO and N Gauges, I eventually worked out why I quickly became disillusioned with those attempts: I wasn't basing the layouts on real locations and I was thus trying to cram too much into too small a space, usually compounding the problem by making buildings from kits that represented a wide geographical area. The layouts didn't convey a sense of realism or location.
My then distant memories of the stations at Newsham and Blyth made me think about modelling a real station. A look at large scale Ordnance Survey maps of the railway-related areas followed. Blyth Council officials had given photocopies of these to me on a school outing to the Council Offices in 1969 - how we lived as schoolkids in those days! Newsham quickly became a no-no to model as it was a quite large junction station and would have required far more space than I had available. This was a shame as I had greater memories of using that station in my childhood.
However that initial disappointment was quickly overcome when I saw the map of Blyth station. I soon realised this was a far more complex station than I ever remembered and it was full of interesting railway-related buildings and features. Importantly for me, I could also model it to scale in N Gauge and, coincidentally, Peco had just introduced a scissors crossover in N that would be ideal for the station throat. Little did I know at that stage just what I was about to embark on…
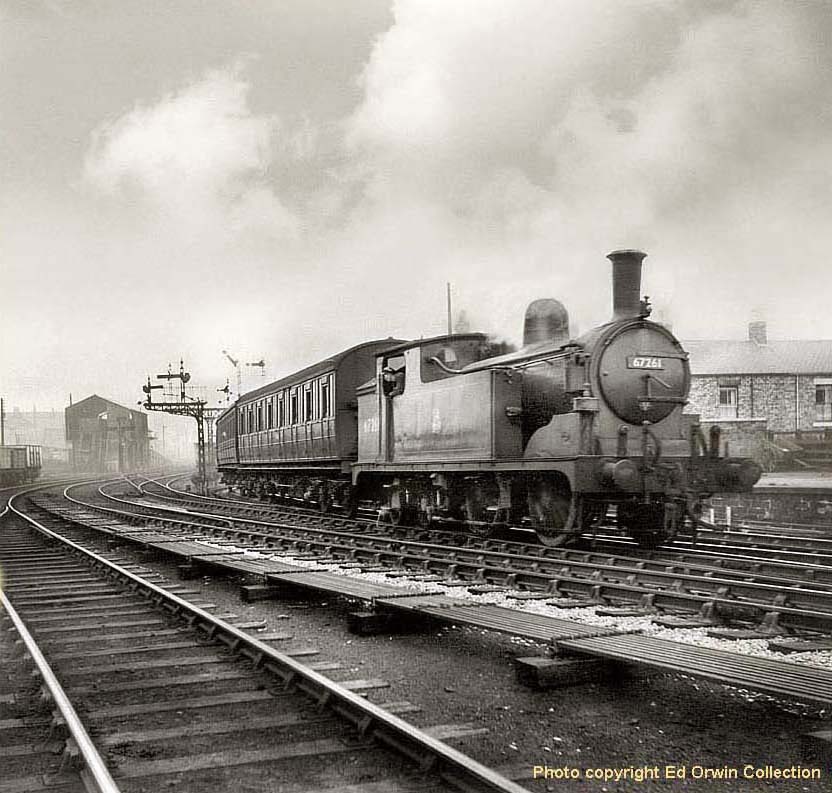
(Above) Push-pull fitted Class G5 0-4-4T No 67261 propels a train over the scissors crossover into platform 1 at Blyth circa 1955. Designed by Wilson Worsdell, no fewer than 110 of this class were built at the NER's Darlington North Road Works between 1894 and 1901 for branch line services throughout the North-East. The class became the standard design, with twenty-one G5s converted for vacuum-operated push-pull working. The G5s were noted for being sturdy and economical locomotives for over fifty years, but with the introduction of more cost-effective diesel multiple units on local passenger services in 1955 the class quickly dwindled in numbers, the last to go in 1958. Click on photo to view larger image. Click here to visit the 'Class G5 Locomotive Company Limited', which has been founded by a group of like-minded Northern railway enthusiasts to recreate a full-size prototypical NER Class G5 0-4-4T locomotive, initially for use on Heritage Railways such as the Weardale and Wensleydale lines. There is an increasing shortage of available steam locomotives of this size and capability on preserved lines, since many of the preserved industrial-type locomotives are either too small, or do not have the capacity to cope with longer runs or heavier trains.
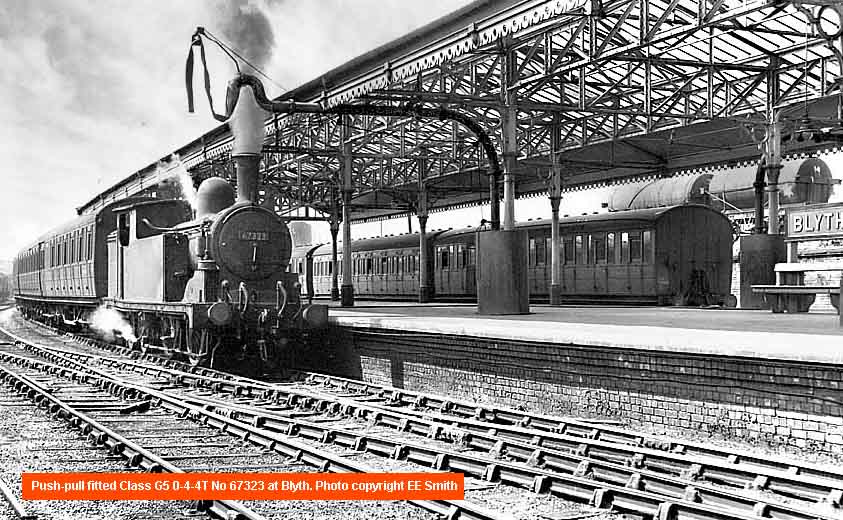
(Below) This was the very first photo I bought and helped to kick-start my research. The more you look at the photo the more you see. Note the two 4-wheeled tank wagons on the high-level line. What do they contain? The possibilities include by-products of the Blyth Gas Company's town gas production (tar or bitumen perhaps) and fuel or lubricants for Blyth Shipyard…perhaps for a ship under construction? Answers on a postcard please! As mentioned elsewhere on this page, old railway photos provide a valuable source of information for the serious modeller...the detail of the platform canopy is superb. As for the Class G5 0-4-4T? Who knows, one day we might see a Class G5 running into Blyth again, except it won't be arriving at Platform 2...in 1973 a new Presto's supermarket (now Morrisons) was built on the site of the old station, and the passenger platforms and high-level line that served the shipyard, staiths and gasworks became a car park (no surprises there then!) which, for the benefit of those too young to remember, explains the two levels of the car park still extant today.
Modelling Blyth Station in N Gauge
Can I say at the outset that I had no great modelling skills when I started this project. My limits until then had been Superquick cardboard buildings and Airfix planes, boats and (occasionally) trains. Soldering and electricity were black arts. I was, however, aware of the amazing skills and great realism achieved by some of the up-and-coming modellers who were being promoted in new magazines such as Model Railway Journal (incidentally reaching standards to which I will only ever aspire). Photos of their layouts looked like the real thing, not models. Grime and dirt were there for all in those captured images: I could almost smell the oil and smoke of my formative years in the sheds around Blyth.
I wasn't sure where to start, and if I were being truthful I wouldn't recommend anyone starting from my level of incompetence to be as ambitious. It's a bit like the old joke when a tourist asks for directions from a local and gets the response - 'Well if I was you I wouldn't start from here…'
Research initially fell onto a clear path: Blyth station and the area I wished to model initially didn't seem to have been high on a photographer's priority list in years gone by, with only a handful of images available in published books. A few more photos came to light trawling through photos for sale in model railway shops and at model railway shows. I put appeals out for info in the popular model railway magazines and, at about the same time, decided to join the North Eastern Railway Association (NERA) and this proved to be the initial kick-start needed to begin a serious research. I received help and info from several people within the NERA membership, one of whom very kindly sent me photos he had taken in 1963 and in 1969. Although they were not of publishable quality, they contained sufficient information on buildings I intended to model. Therefore my first three rules of researching the project had been unknowingly made: Rule 1: Obtain copies of large-scale maps/plans of your intended station. This will enable you to decide if you have enough room to model the station exactly to scale. I was lucky - a lot was crammed into a small area at Blyth, which was the opposite of normal convention and very few compromises had to be made. Rule 2: Join a Railway Association covering the geographical area you wish to model. Over time you will meet many people, each with a small parcel of information, who will help fill in lots of gaps in published data. Rule 3: If someone says 'but the photo isn't very good', ignore the comment and badger them for a copy. You'll be amazed at what you can glean from the grainiest of images, usually of a structure that was otherwise never photographed from that angle. Bob Cassell's photos (below) are a good example...
(Below Left) The railway entered Blyth station on a continuous downward grade culminating in 100 yards at 1 in 100 then a final 189 yards at 1 in 260. In 1904 a passenger train crashed into the buffer stops at the end of
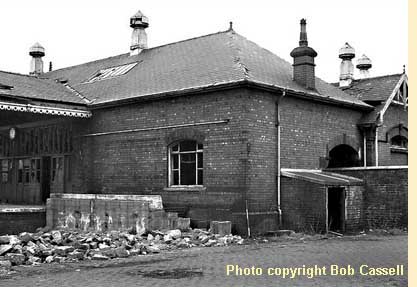 platform 2. Nine passengers suffered minor injuries. Over the years several similar incidents occurred and the buffer stops at the ends of both platforms were substantially reinforced with concrete to prevent errant stock crashing into the station building! This photo shows remains of the reinforced buffer stops at end of platform 1. Prior to closure in 1964 there had been a short parcels platform, of wood construction, in front of the window.
 (Below Right) In order to accurately model the southern elevation of the station building, this is the sort of photo I was seeking - it provides a valuable source of information enabling me to build a scale model that at least looks like the real thing. For example, in the absence of plans I initially made scale drawings of all elevations by counting bricks (I assumed a standard brick size of 3" high x 4.5" wide x 9" long), converting the resulting dimensions to N scale. For example, if a structure is 50 bricks high that is about 150" (150" equals 12.5'). In British N scale (1:148) 1' = 2.06mm so that is 103mm in N. Still with me? (note,
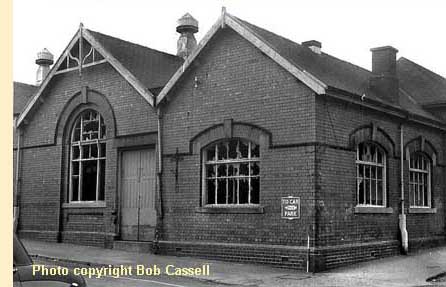 this also means British N scale is about 3% bigger than the more accurate 2mm scale as used by the 2mm Scale Association, a more refined but more labour-intensive way to model in this size). Following closure of the station, the abandoned trackbed for platform 1 and the adjacent sidings were converted into a temporary car park...free! - a sign of the times!
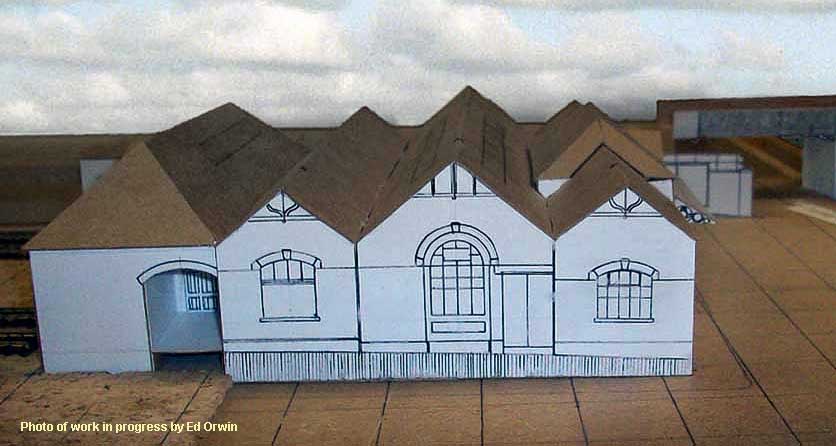
(Below) The temporary card model is the south elevation of the station building, and shows two of the three public access points (the other being at the front). The sliding doors under the archway to the left led into the waiting area. The doors to the right were built into the wall by the North Eastern Railway (NER) in 1908 or 1909; this helps date the glass plate photo at the top of the page, as this clearly does not have this addition. Note how the ground level (vertically shaded) drops away from left to right: this must have been just about the biggest hill in Blyth apart from Ballast Hill and the pit heaps: all hills in Blyth are very much man-made!
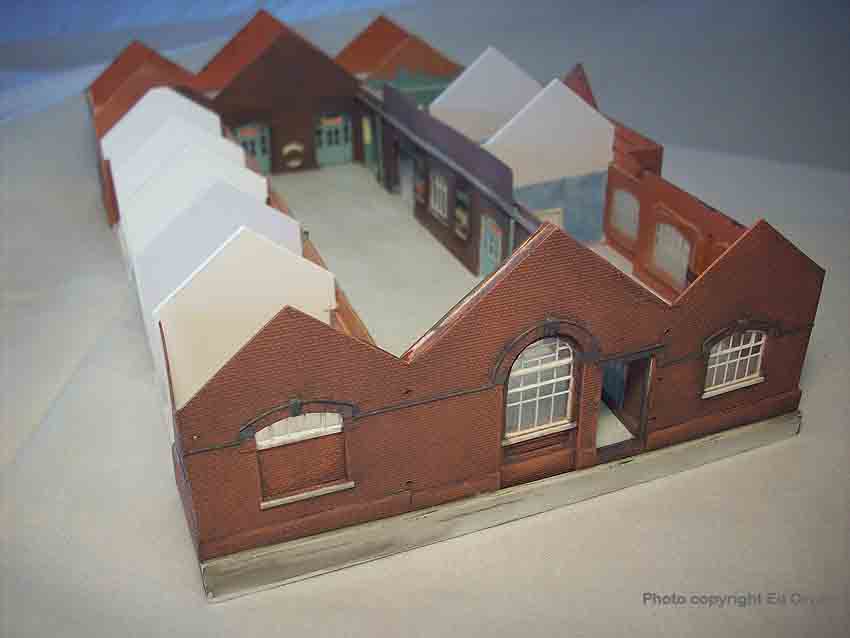
(Above) This photo shows the main station building under construction. I'm detailing the interior central section as I intend to design the roof to be removable: hopefully this will bring back memories for those of us who were lucky enough to remember the real thing! All interior and exterior posters are correct for the period I'm modelling, scaled down from info available on the Internet. I've yet to model the W. H. Smith bookstall that was inside this central 'hall', next to the Gentlemen's toilets, and to complete this building I need to add the station clock, canopy over the frontage, signs to replicate the original enamel 'BRITISH' and 'RAILWAYS' and, of course, the roofs!
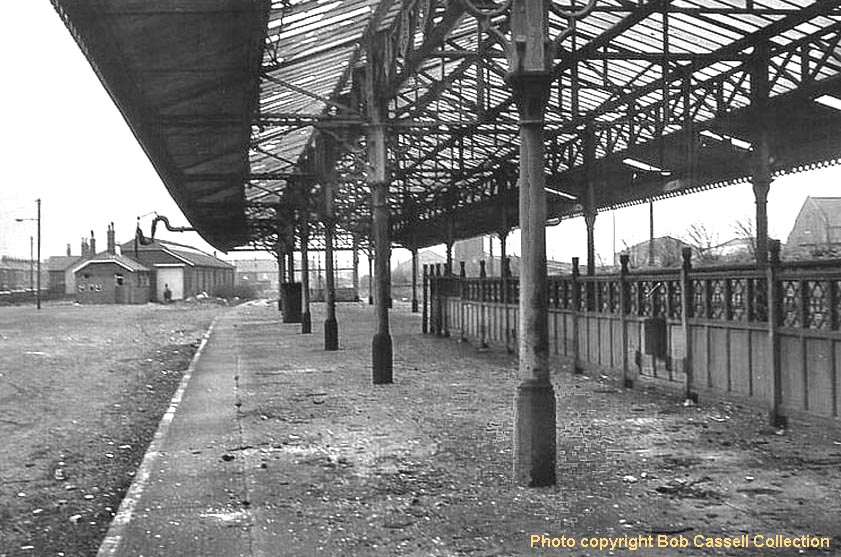
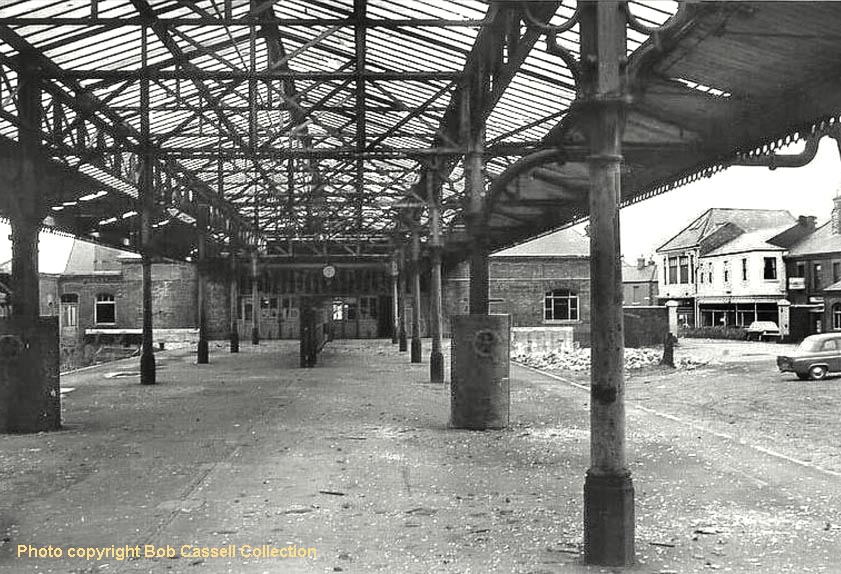
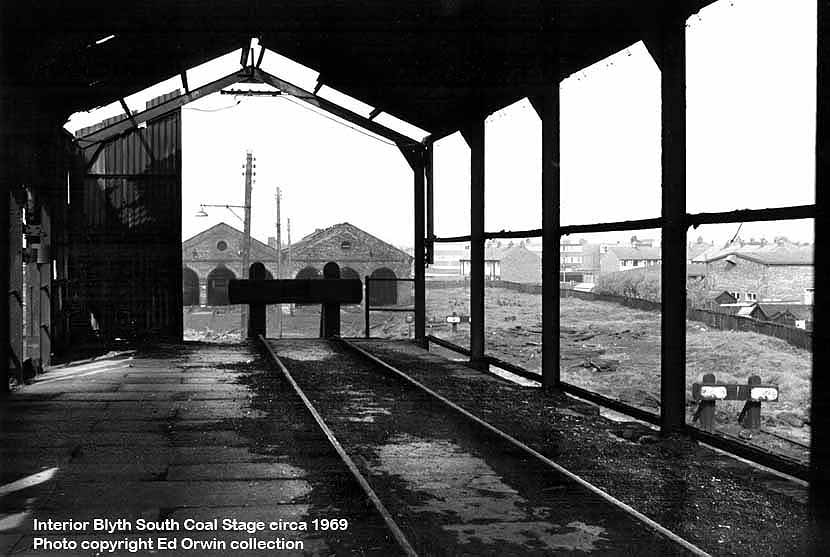
(Above Below) Taken circa 1968 after all tracks in the station area had been lifted but with most of the infrastructure still intact, this photo is in the 'up' direction looking west. The goods shed and adjacent toilet block are visible on the left, as is the wall separating the railway from Delaval Terrace. Note the standard NER platform dividing screens, which I believe extended the whole length of the canopy in earlier days. I have asked York ModelMaking (see below) to produce these for me and they may add them to their product range in due course. Parts of these screens were actually sliding gates with cast iron wheels 'running' on metal rails. This allowed platform staff to open the gates and let passengers cross from one platform to the other. I suspect they fell out of use when the screens were reduced in length. Note the metal litter bin: this was a standard BR bin in North Eastern Region tangerine marked, unsurprisingly, 'LITTER'. It had a wire mesh basket insert when the station was in use. (Above Right) Turning 180 degrees we are now looking in the 'down' direction to the remnants of the buffer stops. The controls for the water columns, one for each platform, can be clearly seen. These water columns were in everyday use until cessation of steam passenger services in 1958. Although there was a standard NER water column on the running-in ramp at the platform end, this was hardly ever used - those visible in this photo were more appropriately located for the short-length local services. The white-walled furniture shop in the far right of the photo still stands.
(Below) The photo below shows a model section of the platform canopy framework constructed as a trial by York ModelMaking of Stockton-on-the-Forest on commission from me - click here for link to the company's website. I decided a few weeks ago that life is too short to attempt this by myself from scratch, so the company will provide a kit of parts for me to assemble the whole canopy accurately. They can laser cut wood and plastic, and are producing the canopy from copies of the original 1894 architect's plans and prototype photos I sent them. I've also asked them to produce the standard NER platform barrier that ran most of the platform length under the canopy, and which would have been difficult for me to accurately replicate. Not cheap but a worthwhile investment to free up my time to do other things, especially considering the canopy will be a major visible feature of the layout. Unfortunately they are unable to produce more solid shapes such as the canopy support columns (those in the photos are just plain styrene tubes), but I currently await a quote from a company in Essex who should be able to produce the columns accurately in ABS plastic.

To compliment my research, where I was principally looking for photos so I could make an 'informed' decision as to whether or not it was realistic to go ahead with my project, I made good use of Blyth Library, Northumberland Records Office and the Public Records Office at Kew, London - now known as the National Archives. They each had a little information, and most importantly the PRO had an architect's plan dated 1894 for the weighbridge hut adjacent to the station building, a structure that I had no photos for at that time. I purchased a copy of the relevant areas of the plans. Remember these were the days before the Internet (of which more anon). Additionally Blyth Library staff introduced me to the Local History Society. Therefore my advice to anyone undertaking a similar project is to make good use of the local library, County Records Office and PRO. Ask them about other possible sources of info.
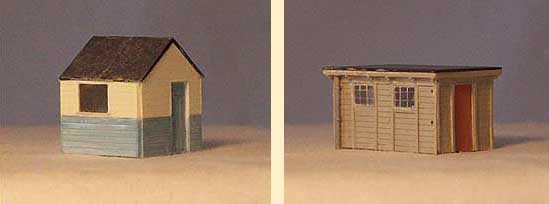
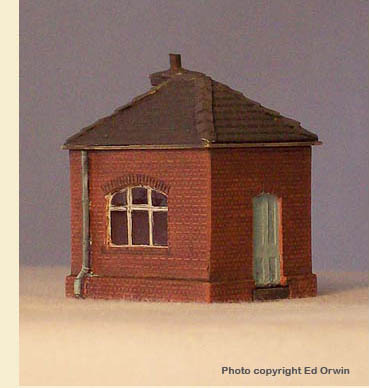 (Right) Whilst undertaking this primary research I took the dodgy step of modelling my first building - the weighbridge hut from the plans at the PRO. I say dodgy because I had no idea if I would ever get sufficient info to be able to model all the buildings within the area I intended to model, and I had no idea if I could scratch-build to a standard I would be happy with. I had sufficient experience with card structures to know that this medium wasn't for me. I decided to build in plastic card, which uses liquid solvent cement for assembly. Usefully this is available with brick mortar courses (and other finishes) moulded in, for added realism. I scaled the dimensions of the architect's plan down to N scale (about 2mm to 1 foot) and set about constructing my first scratch-built building.
(Below Left) This photo shows the weighbridge hut on the left and the adjacent hut constructed later by the NER to its right. I do not know the purpose of this later addition but my own model was lucky to survive
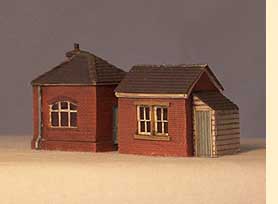 being trampled on by a young girl at an exhibition a couple of years ago - quite a lot of work was required to repair the rear half of this little hut. Fortunately the front of the hut, with its mullioned window, was not damaged.
 (Below) The middle photo shows the smallest building I've constructed so far. This hut which was situated on the embankment above the retaining wall behind the station platform. I didn't know it had existed at all until I saw it in the background of a photo in a railway magazine a few years ago. I used that photo to make scale drawings of the hut prior to constructing it from Evergreen plank-effect plasticard (1mm pitched grooving is equivalent to 6" planking). The concrete hut was a standard LNER prefabricated design, and was situated near to the hut in photo - typically, shortly after completing this model a manufacturer brought out a model of similar style…
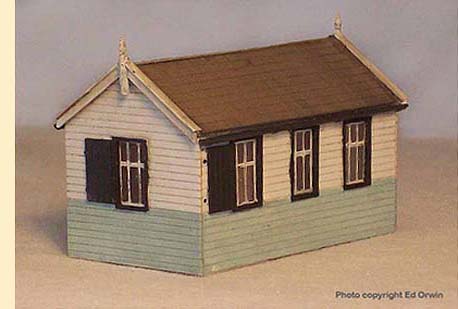
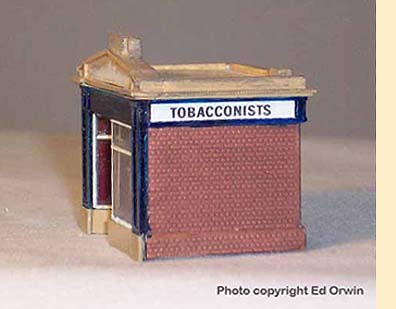 (Left) Finlay's tobacconists shop was located on Turner Street, immediately in front of the station building. This was a vaguely art deco design with a concrete façade, presumably built circa 1930 on the site of an earlier building of wooden construction. As late as 1958 there were plans to relocate Finlay's a few feet further north, for reasons unknown to me. This never happened, and the building remained in situ until after completion of the supermarket constructed for Presto on the site of the station building in 1973. The wood office-mess room was adjacent to the turntable and engine shed. From its style I guess this was also of LNER origin; it was not demolished until around 1969.
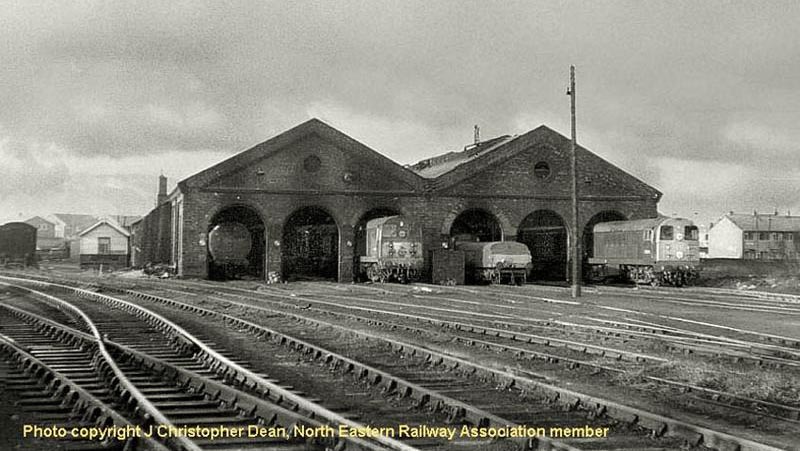
  (Right-Below) The wooden office-mess building featured can be seen in this wide view of South Blyth shed in diesel days; a pair of Class 20s are in residence on roads 3 and 6, and lurking behind the brake tender in road four is a Class 37. Inadequate braking power was a major problem on loose-coupled freights, and these low-profile diesel brake tenders were attached to locomotives to provide additional brake power for non-fitted and partially fitted goods trains; the tenders provided a deadweight load equivalent to six brake vans pending the arrival of fully-fitted freight workings for Blyth's heavy coal trains. Blyth South shed was originally built as a 3-road shed in 1874, with three extra roads added on the right in 1895. Though built in a very similar fashion there are many subtle differences including the supporting stones at the ends of the arched doorways.
Although I am happy with the eventual results, my advice to anyone pursuing the same standard of authenticity is to not rely entirely on architects' plans - real buildings are rarely built exactly as drawn, unless the building preceded the drawing! Many buildings are altered in their lifetime, sometimes drastically. It is also important to determine the period you are going to model before actually building
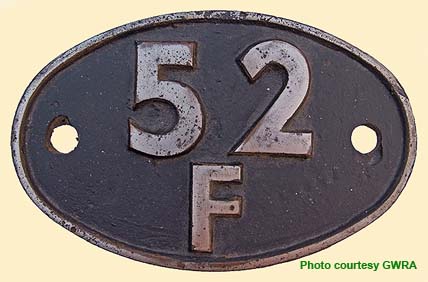 anything. I chose the 1950s (specifically 1958, as this was the year that steam passenger services at Blyth gave way to DMUs, the railway infrastructure was still all intact, additional operational interest could be attained by the wide range of freight and special passengers services still running such as steel plate for the shipyard and football specials, and many of the photos I was accumulating were taken in that period). Another piece of advice is to decide from the onset what standard you wish to achieve and aim for it. Thus as your skills develop there will not be such a big difference between your earliest attempts and later ones, or else you may be tempted to abandon your early models and never get around to completing the layout. Start with something small and 'simple'. Think about what medium you are likely to be happiest with, and how you want to construct the model before cutting anything. Oh, and measure twice, cut once - no, you won't remember that last bit every time! (Inset) A locomotive shedplate 52F went under the hammer for £95 at a Great Western Railwayana Auction in May 2012.
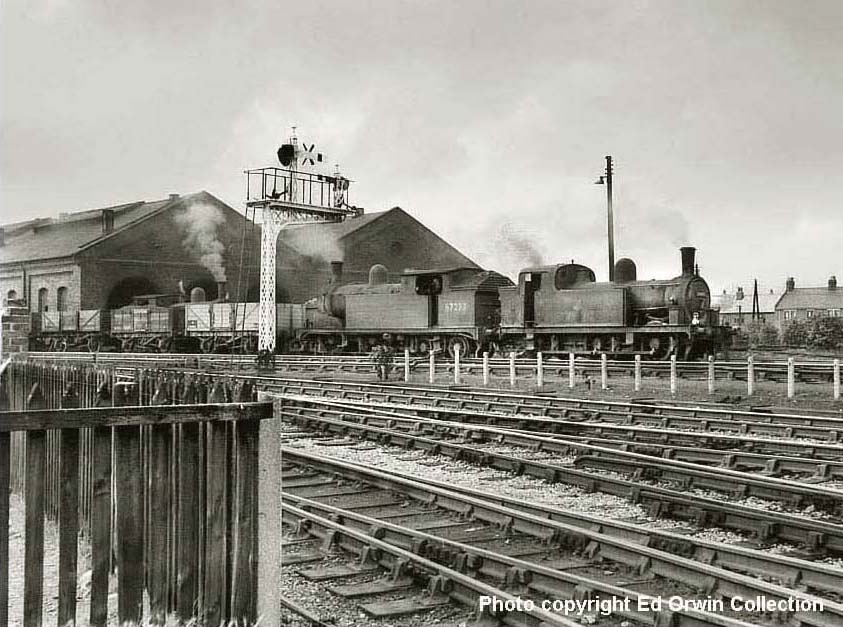
(Above) A Class G5 0-4-4T and Class J77 0-6-0T - the latter used for shunting the staiths - rest between duties at Blyth South Shed. Although the photo is taken from the same angle as the model photo below, the cameraman is standing nearer the goods shed and thus his shot does not show Catherine Terrace, which is featured in the model photo. However, the newish concrete post and wood fence is of interest: this would have been built in 1941 to replace whatever fencing existed prior to the April 1941 Luftwaffe air raid that destroyed 6 houses on Catherine Terrace. Also the ballast indicates that new trackwork has replaced the damaged original, since the rest of the station trackwork was ballasted in traditional cinder/ash.
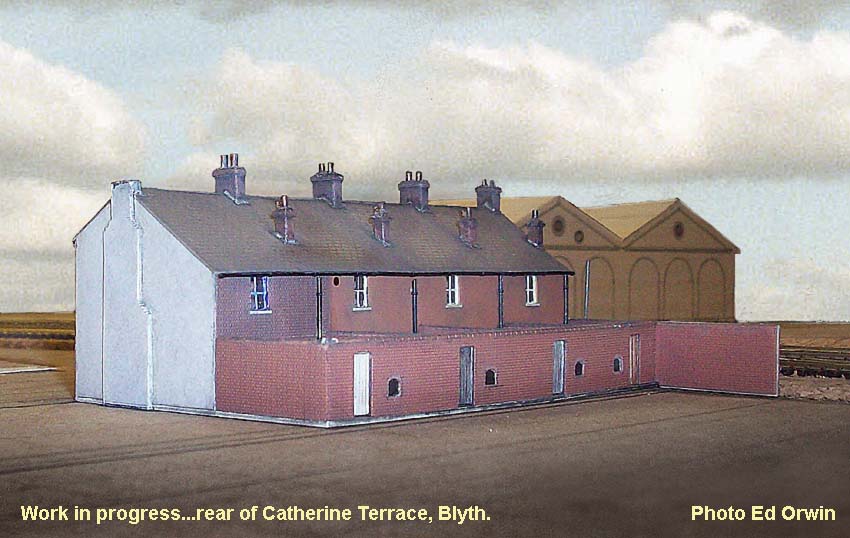
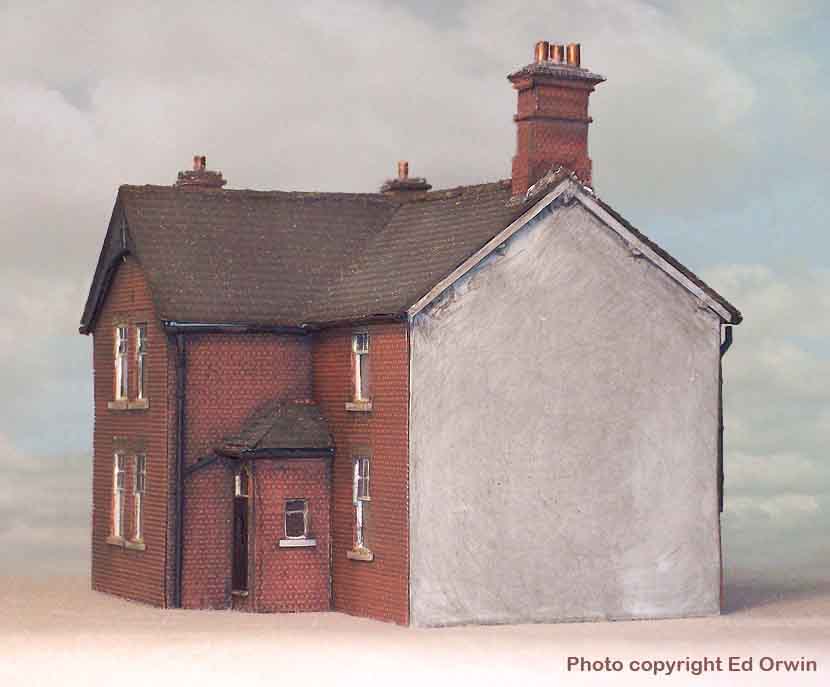
(Above-Below) These photos of the Stationmaster's house, Blyth Crossing box and Catherine Terrace are reproduced larger than N scale - a cruel close-up for the most discerning modeller! (Above) These four houses were all that remained of the longer rows that had existed prior to the April 1941 Luftwaffe raid, hence my attempt at the post-1941 rendering of the left-hand end. The right-hand end of the terrace had been truncated by the NER in 1894 as part of the extensive rebuilding of the line. I think they were finally demolished in the late 1970s. (Below) The rear of the Stationmaster's house, built from drawings I made from photos both historic and recent (it's the only building still standing in Blyth town centre that belonged to the railway) it was only after I finished the model that I obtained the original architect plans...
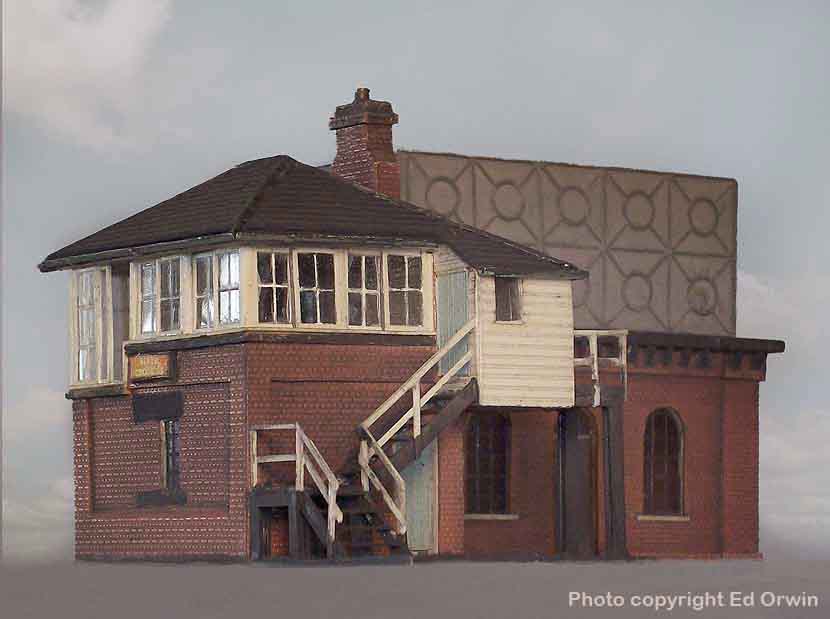
Having built my first building it was many weeks before I decided on the next stage, weathering. The brick sheet as bought is rather bright and glossy, two things that the real buildings in Blyth in the 1950s could not be accused of being! Having read, re-read and finally just about understood the very basics of weathering from modelling books, I took the plunge and armed with enamel paints, paint thinners, a brush and a plastic palette, I nervously applied a great big wash of dirty thinned brown/black paint to my precious model. A couple of minutes later this was rubbed off carefully with a paper tissue, and to my surprise the brickwork was nicely toned down, no longer glossy and the mortar courses were suitably ingrained with paint. The moral of the story is not to be afraid to having a go at something you haven't done before. Read up about it first - indeed when it comes to railway modelling someone else will have already made the same mistake before you, learned from it and then written about how to avoid it.
However, if you're still unsure, practice on some spare material then take a deep breath and have a go for real. Better still, join the model railway society for the scale you are modelling in. I am now a member of the N Gauge Society and have learned so much more about all aspects of modelling in that scale since joining. More recently I have joined
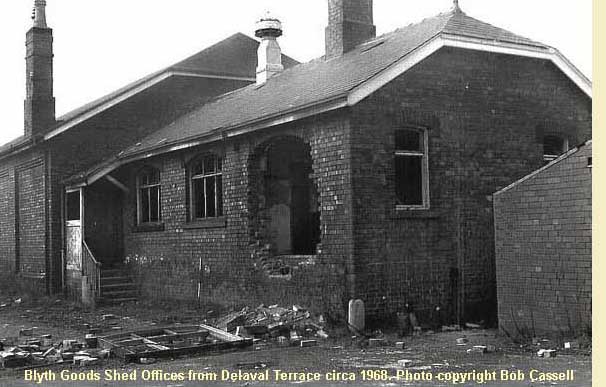 the Blyth & District Model Railway Society where my baseboards now reside. I have received much help and support from individual members, and wholeheartedly recommend anyone wishing to develop their modelling skills to join their local Club.
(Left-Below) With my newly-discovered sense of confidence in scratch-building I then perversely decided to model the only other building for which the PRO had decent plans, the goods shed. In doing so I thus managed to break at least three of the rules I had unknowingly made for myself. The first was that the office annexed to the goods shed was not built as per plans, the actual building being narrower than drawn and having the entrance to the rear rather than the east end, and the main roof of the goods shed was shown tiled. Alas when I set about the task of modelling the goods shed I had no photos showing the office entrance in the 1950s, nor did I have any good photos of the goods shed roof. Typically, a photo turned up in the 'Model Railway Journal' just after I had built it wrongly, and good photos I later received of the building just prior to demolition in 1968 clearly show the main roof as having been recovered in felt in the aftermath of parachute mine damage from 1941. The entrance has yet to be corrected: the roof has been corrected (using tissue handkerchiefs delaminated to single ply, cut into strips, placed on the original plastic card roof and soaked in liquid solvent cement). To get the effect of the inset brick panels on the main goods shed walls I laminated several bits of brick plastic card together that subsequently warped. However, since the goods shed will be at the front of the layout, I decided I couldn't live with this 'interesting' effect and had to rebuild the entire side.
I suppose this inadvertently leads me to saying - If you're not happy with it, start again otherwise you'll regret it long-term. Learn from the mistakes and be patient!
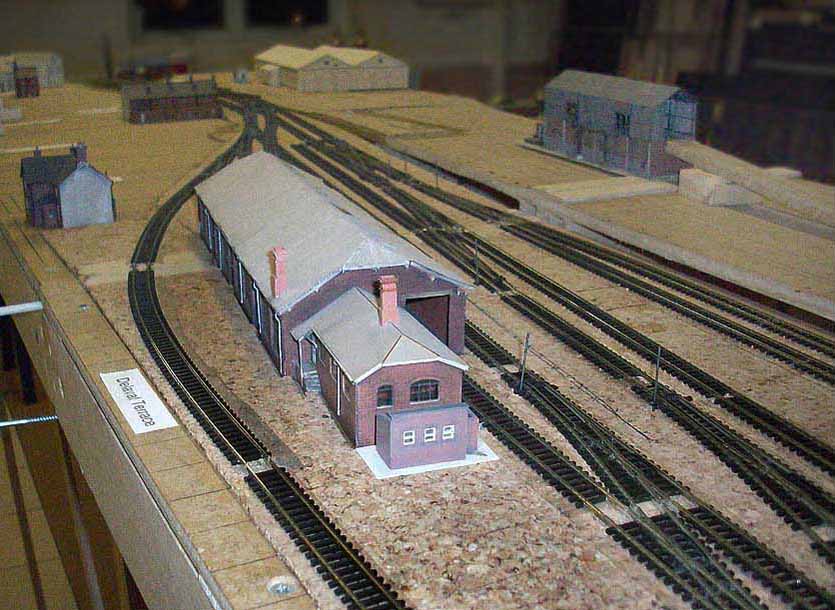
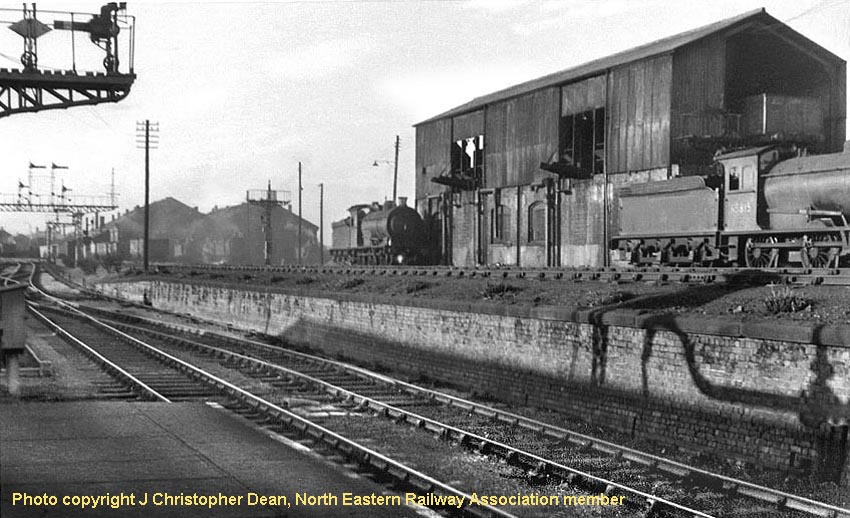
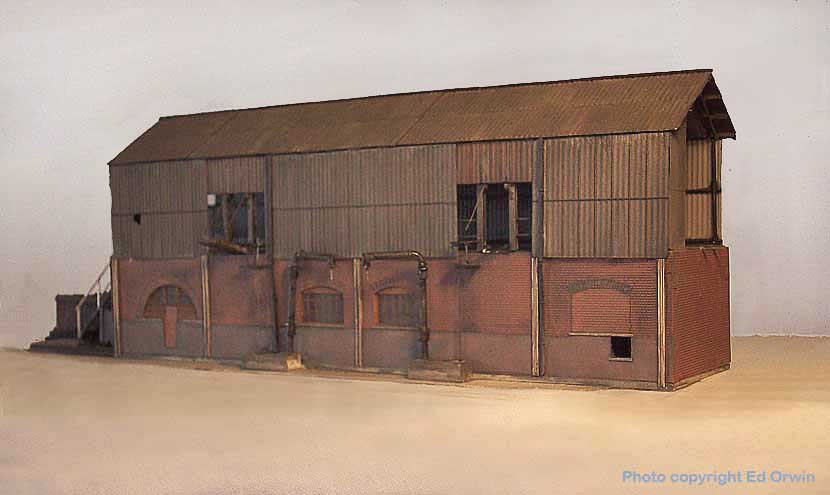
(Above-Below) Soon after this page was posted on the Internet several people have enquired about the model of South Blyth coaling stage, which is featured on the photo-link from page one of the old site. Therefore I'm adding two photos of the model to replicate the prototype shots shown above and below each one. The upper level of the model uses Ratio corrugated-effect plastic that I thinned down at exposed edges to make it more realistic: fortunately the type of plastic that Ratio use is quite soft and easily filed. The hole in the front left-hand side of the corrugations is prototypical (see Fred Wagstaff's comments below). Framework is 2mm scale (not N scale) rail. The LNER completely rebuilt the upper level of the coaling stage shortly after a land-mine destroyed the nearby signal box in 1941. Although the original upper level and roof apparently survived the blast they were weakened, and either blew down or had to be pulled down and reconstructed a few weeks later. It remained in this form until demolition circa 1970. The coal at the west end of the stage is real, crushed in a plastic bag with a big hammer and glued in place with PVA wood glue thinned with water, a small amount of washing-up liquid added to allow the glue to permeate through easily. I entered this model in the N Gauge Society's modelmaking competition at Urmston in May 2010: It won the 'Past Winners' Trophy. Taking photos of the models is proving a useful modelling tool for me. Until I saw the comparison shot of the original building I hadn't realised that I've set set the handrails too high on the model - note how the top of the left handrail should be in line with the centre height of the buffer beam. I should be able to correct this through time, although it will be an exercise fraught with risk as this is a fragile bit of the structure.
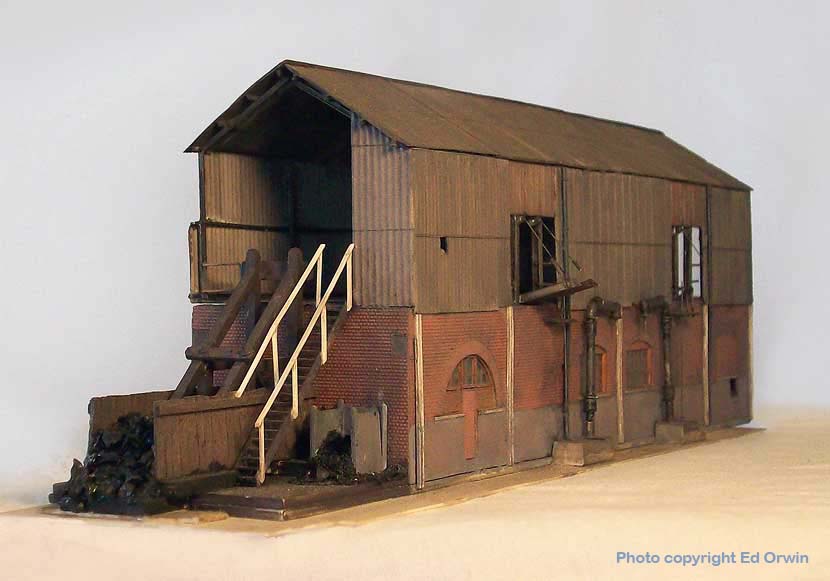
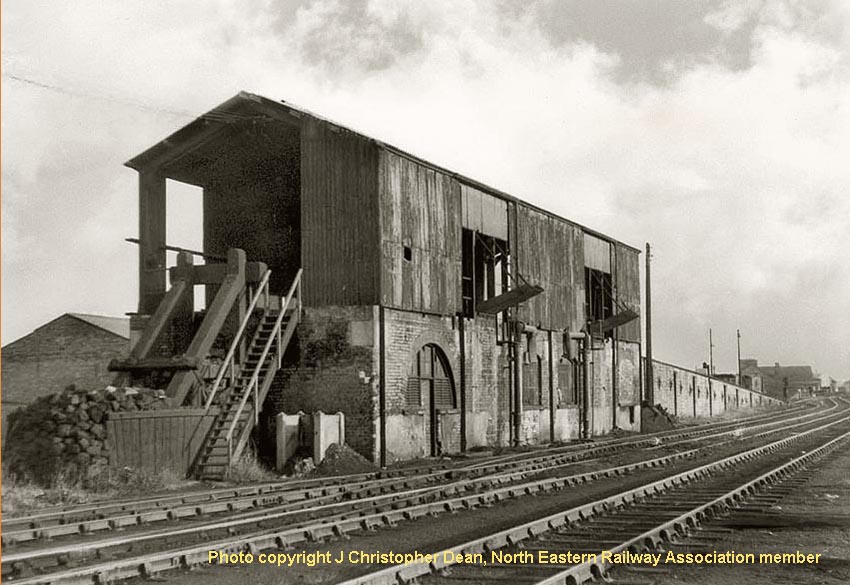
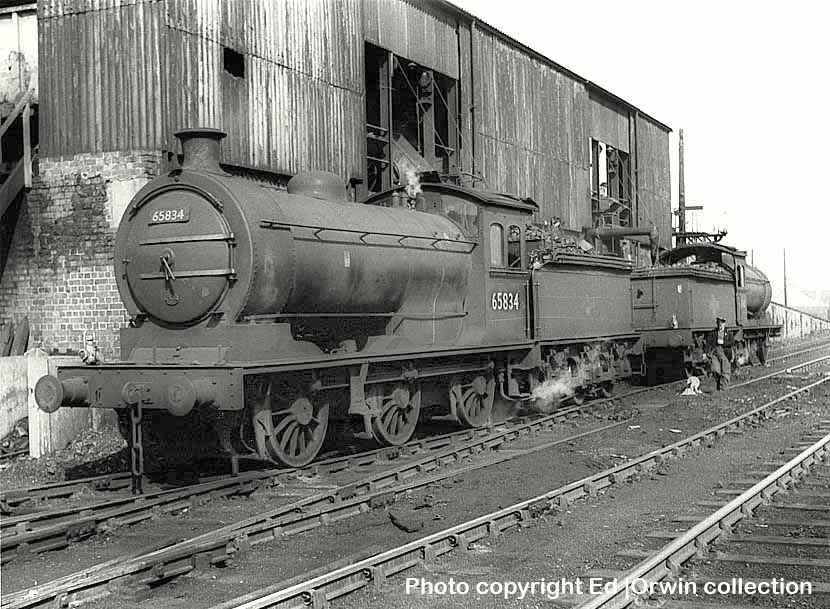
(Above-Below) Researching old railway photographs is fascinating because even the smallest detail in them usually have a story to tell, which, on the face of it, might easily be missed or simply ignored and so the story remains untold - hidden human stories that link up together to form the outline of a bigger picture.
For example, the mysterious cut-out in the corrugated wall mentioned above is solved by ex-South Blyth railwayman, Fred Wagstaff, who comments - 'The hole was used by the workmen on the stage to spy uninvited company approaching. In the left hand corner of the interior shot (above right) is where the coal man's cabin/casino used to be. Every Thursday (payday) a huge card school started at around eleven in the morning and carried on well into the night - or until you lost your wages, which I did on one occasion, and had to borrow three quid to pay my old Mam her wack! That dirty little corner of the coal stage certainly had some tales to tell, believe me!'
(Below) Having decided on the structures he intended to model, Ed then went ahead with construction of the main baseboards and a start was made on installing the electrics featured below...
CONSTRUCTION OF MAIN BASEBOARDS
By now I had accumulated sufficient photos of most of the structures I intended to model. This meant I could go ahead with the next phase, construction of the main baseboards. At this stage several things had to be decided upon, bringing me unsurprisingly to a few more rules I set myself: the layout had to be portable for exhibition purposes, so the baseboards had to be lightweight and small enough to squeeze into the average car, but not so small that I would have too many baseboard joints.
From the original OS maps, along with detailed architects plans from 1894 I had by then acquired, I was able to draw a one-foot square grid onto copies of the plans. The main area to be modelled thus worked out at 10 feet long and 2 feet 6 inches wide, so ideally the area required 3 boards each 3 feet 4 inches long, but I quickly realised that the baseboard joints would be in inconvenient areas of complex pointwork. Therefore I decided on two main boards each 5 feet long which coincidentally hid much of the baseboard joint behind the goods shed (which straddles the joint and is obviously removable).
 One of the most important features of baseboard construction is to avoid having a baseboard joint where there is pointwork, easy enough on an imaginary trackplan for a layout, but not so easy when modelling a prototype to scale - I still have a joint in the middle of one crossover, though it could have been worse!
Hiding the baseboard joint is another important factor, and for me the prototypical position of the goods shed at Blyth offered a perfect solution to the problem, as it acts as a view blocker and therefore visitors have to peer around the obstacle, just as you would with the real thing, which makes for interesting viewing.
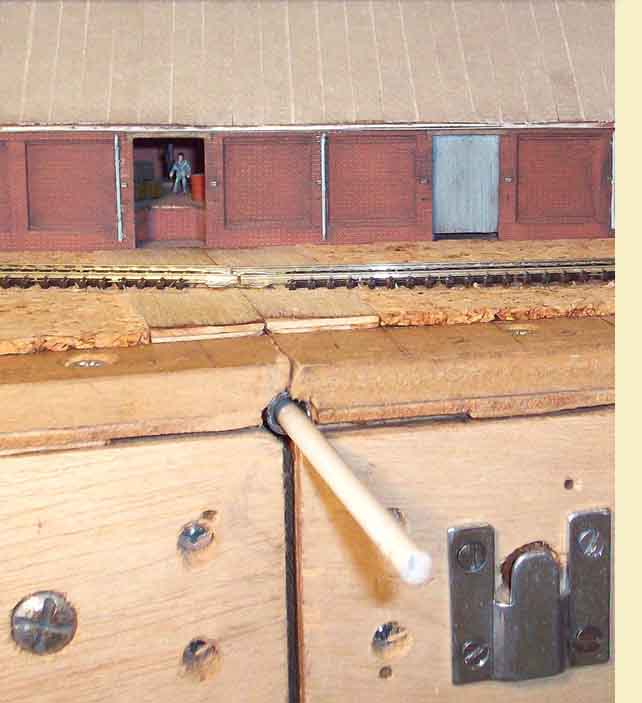
(Left) A front view of the goods warehouse, which will remain a removable structure as it straddles a baseboard joint. It is viewable only from the front therefore it usefully obstructs much of the joint. This joint will be further hidden by a removable model of the flowerbed that existed in LNER and BR days immediately past the passenger platform end just behind the warehouse. The model flowerbed will add some welcome colour to the layout! It is important to ensure the baseboards are perfectly aligned with each other horizontally and vertically every time they are erected. There are many fancy and sometimes expensive ways to do this. The simplest and cheapest way though is to use standard door hinges, one on the top of the baseboard frame and one on the bottom near each corner. Once the hinges are fitted I remove the four hinge pins and replace them with shortened knitting needles of the correct diameter: the knitting needles are easier to insert and remove as they won't rust, have a tapered end and small flat 'handles' that
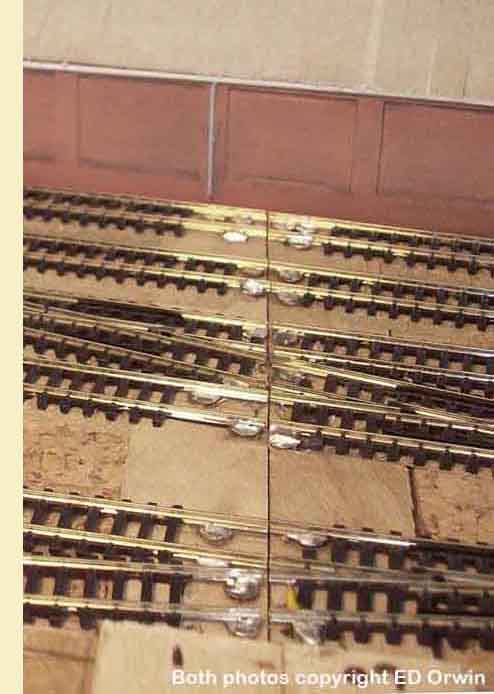 mark their size. One of them is visible at the front of the baseboard joint. Both photos are joined together; click on either one to view larger images.
(Right) This is the rear view of the warehouse showing the trackwork crossing the baseboard joint. It is vital to ensure adjoining tracks are perfectly aligned and at the same height, otherwise poor running and derailments will inevitably occur. To ensure good running I firstly glue strips of 3mm thick ply along each edge of the boards, butting up to these strips 3mm thick cork tiles that I use as underlay. I then mark the rail positions and insert screws into the ply strips where the rails will be. A short length of sleepered track is placed next to each screw and the screw adjusted so it sits a fraction of a millimetre below the base of the rail. The heads of the screws are gently filed clean and flooded with solder, the permanent track similarly prepared after removing the sleepers adjacent to the screws, and finally the track is placed across the baseboard joint and, once I'm happy that it's perfectly aligned, the rails either side of the joint are soldered to the screws. The final job is to cut the rail over the joint using a razor saw.
The height of the layout is important too. I've chosen about 4 feet, higher than most layouts are set, but this is because I don't want visitors to look at the layout as if they are in an aircraft: I want them to have a realistic view from just above ground level. Always a contentious issue as visitors short in stature, some disabled and children may have a problem. It's a good height for me to work at though, and perhaps ramps, etc., could be made available for anyone unable to get the view they would like.
Having constructed the baseboards (Dad was a carpenter by trade and through watching him make things from wood in his hut at the bottom of the garden I obtained some basic joinery skills many years ago which I have singularly failed to improve on since then) I started laying track. This is not as easy as it sounds on a track layout as complex as Blyth since there are around 50 points crammed into a small space. I subdivided the initial 1 foot squares on the plans into 1 inch squares numbered 1 to 30 on each boards' X axis and 1 to 60 on each Y axis, and reproduced these on the baseboards. I then was able to draw the exact location of all the points and plain track, albeit a few minor alterations had to be made using Peco point plans as I was using off-the-shelf points, not hand-built ones.
At this point, thinking I had covered every possible angle, the next task was fitting the point motors beneath the baseboards and that's when I realised I'd dropped a clanger - only by a fraction mind, but it was enough - a pesky joist under one of the points! After much chiselling, sawing and drilling - and grinding of teeth too come that - a couple of joists have ended up looking a bit sorry for themselves but the structural integrity is still okay. It was a valuable lesson learned.
BLYTH STATION - THE ELECTRICAL SIDE
At present there are two basic choices for the electrical control of a model railway: either conventional 12v DC analogue control, or the more recent Digital Command Control (DCC). When I first started modelling
 Blyth station the electrical side of things was, quite frankly, a major problem for me as I didn't understand anything other than the most basic aspects of model railway electrics, and as I had no previous practical experience in electrics other than connecting two wires to an oval of track, I forced myself to read over and over again all the well-known 'simple' books on DC electrical wiring for model railways. This included the late Cyril Freezer's 'PSL Book of Model Railway Wiring' which was about as simple as it got - so simple in fact, that by the time I'd read the book about 20 times (I kid you not) even I realised that there were some printing errors in the book that had caused me a lot of unnecessary head scratching.
I began by drawing up and photocopying the trackplan, and then adding the basic electrical sections for analogue control and isolating sections, but I kept getting my undergarments in a twist! I was terrified of the number of section switches I would need - up to 18 isolating sections were necessary for the engine shed alone - and I just kept putting off the inevitable day when I would have to do something about it. Even more complicated was the amount of pointwork at the station throat, and it looked increasingly likely that I would have to call in a professional - goodness knows how much more that would have cost!
Then a major development in the hobby came on the scene that helped changed my mind: DCC was becoming the norm in the USA and it was being introduced in the UK. At the same time some N Gauge modellers were successfully installing digital decoders (chips) into small locos. Meanwhile two major manufacturers of N Gauge locos started to make their products DCC ready - a 6-pin decoder could be simply plugged into the socket on the chassis, avoiding the risk of me writing off a loco trying to solder tiny wires. Better still, advances in Chinese manufacture and improvements in the design of mechanisms gave
 locos far better low speed performance than traditionally associated with N Gauge, and DCC promised to enhance this even further.
Feeling a little more confident, I bought three booklets published by PECO which includes wiring diagrams for both conventional DC and the newer DCC wiring - not just for individual points but also for more complex double crossovers, slips and double junctions. They even have simple diagrams showing how to get point motors to work together using just one switch for crossovers, and for the first time I had all the wiring information I needed to get started on my layout. Halleluyah!
I also came across an excellent US website 'Wiring for DCC' - click here for link - developed by a modeller for modellers, which contained loads of useful info on DCC. I highly recommend it before you take the DCC plunge, but don't be put off by some of the more alarming things it says can happen if you don't do things right, or else you'll look for a safer hobby such as bungee jumping without a bungee!
At the time of writing (the layout is still under construction) I intend to exhibit Blyth Station at model railway exhibitions, therefore I am aiming for as close to 100% electrical reliability as possible, with smooth running (especially over the point complexes) and 'hands-free' shunting. There's no point (sorry,
 unintentional pun) trying to make a layout realistic if trains are constantly failing on points due to bad electrical connections, and the operator's hand has to make a God-like appearance from the sky. Therefore the decision had been made - it's DCC for me. The benefits far outweigh the initial cost of the controller and the extra cost of each 'chip'.
So having read and even understood the basics for successful DCC operation, I set down my own needs for the layout.
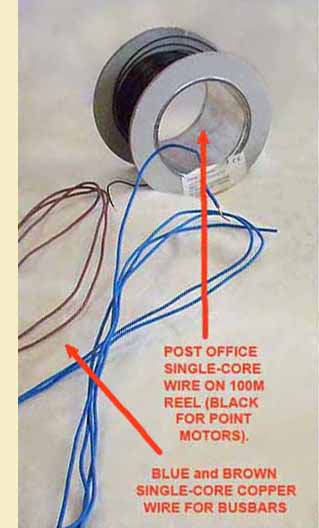
I decided to keep it simple by using colour-coded wire (adopting red and blue for track feeds, yellow for point frogs, black for point motors) and sticking religiously to each colour throughout. It is important that every point and piece of plain track should have its own feeds - ie no reliance on fishplates and no soldering of wires to fishplates unless the fishplate is soldered to the rail. These feeds are in the form of red and blue 'dropper' wires (ie multistrand wire for flexibility, each wire comprising 7 strands). The main feed wires from the controller (the 'busbar' in DCC parlance) to be solid single-core copper wire stripped from standard 'twin and earth' cable. This would give one blue 'busbar' to which all blue droppers would be soldered, and one brown 'busbar' to which all red droppers would be soldered. These two wires connect to the DCC Command Station (DC equivalent is a control unit, but to say equivalent is an insult to the abilities of DCC). I opted to use PECO electrofrog points thoughout, but all had to be modified to make them more reliable long-term (see later section). Also I have used SEEP point motors where possible as these include an integral switch for changing frog polarity when the motor is electrically thrown, thus cutting down on cost. I opted to use PECO point motors where it is necessary to utilise a twin microswitch, such as at double
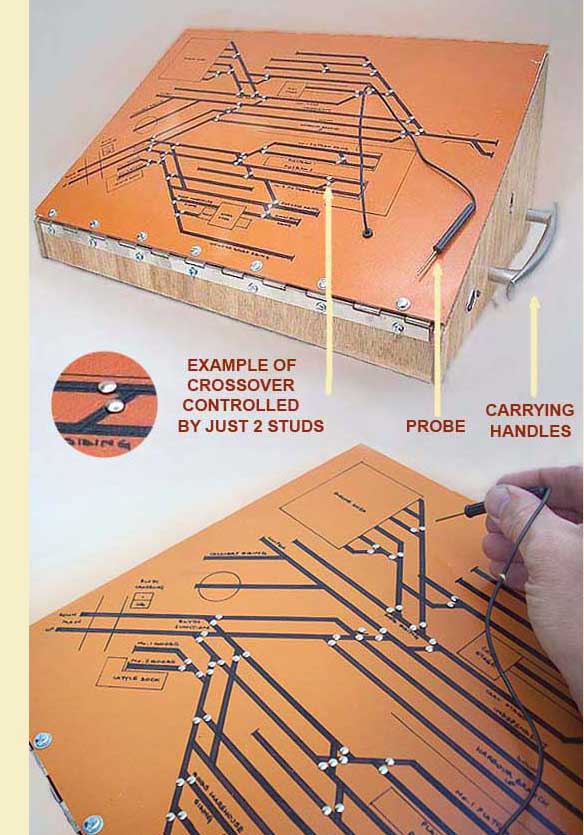
 junctions. For further guidance the excellent PECO booklets are available from good model shops. The points are operated by 18V AC 'stud and probes' from a home-made point control panel electrically attached to the baseboards by computer 25-way 'D' connections. I need 4 sets of connections for Blyth, two for each baseboard, and this system removes the need for extra cross-board electrical connections. I could have chosen DCC point operation that would have enabled route setting, etc., but I felt this would have distanced me from having fun with a mimic diagram like a real signaller has in a lever-frame signal box. It was important that point motors could be easily removeable in case of failure: thus the 6 wires from a SEEP point motor, for example, are connected to a screw terminal block rather than soldered directly into the main wiring. The risk of point motor failure is reduced by a Capacitor Discharge Unit (CDU) built into the point control panel. This also allows one set of studs to throw more than one point at a time such as crossovers, thus reducing the amount of wiring (and studs) necessary. I dispensed with the ugly standard European N Gauge couplers in favour of MicroTrains knuckle couplers. These are less obtrusive and can be operated remotely by either electromagnets or permanent magnets located in strategic positions between the rails. Having said that, in late 2009 Bachmann launched their own coupling system in the USA. I haven't read anything about it yet but await news with interest.
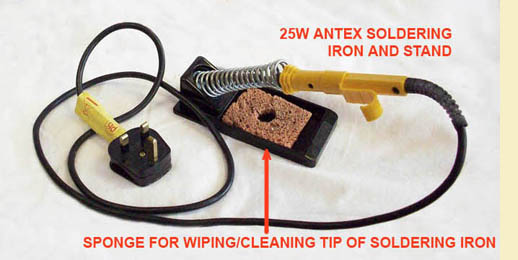
(Inset photos above) It's difficult to get anywhere in model railway electrics without acquiring the ability to solder wires to rail, wires to point motors and wires to wires. Having read up on the subject until I understood it I've now overcome my nervousness, and can happily solder wires to rails on plain track and
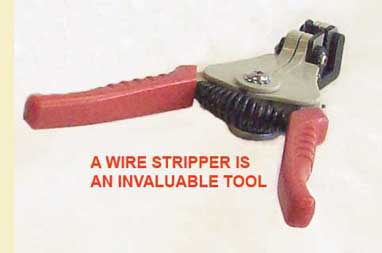
 points and only occasionally melt the adjoining sleepers. The key to soldering wires is to use a good iron. Mine is a 25W Antex from Maplins. It is a good idea to keep the tip clean by wiping it on a damp sponge frequently. I also use resin-cored solder, and keep it clean by pulling the loose end you are about to use through a folded piece of emery paper. If soldering to a rail, it's a good idea to first use a fibreglass brush or emery paper to clean the area to be soldered, and if soldering multistrand wire, tin the wire before soldering it to anything else to prevent fraying. I do the same if connecting multistrand wire to a screw terminal block. Finally, a good wire stripper speeds up the preparation stage and reduces the chances of multistrand wires being accidentally cut.
The following photos show the progress being made with the electrical side of the layout. As mentioned earlier, two independent electrical systems are being used: 18V AC, for switching the point blades via SEEP or PECO point motors through a Gaugemaster CDU. This prevents the risk of accidentally burning out a motor and allows more than one set of point blades to be switched simultaneously. Secondly, Digital Command Control (DCC) is being used for running the locos via two 'busbars', one busbar connected to the red dropper wires I had soldered to each 'north' rail earlier, the other connected to the blue dropper wires soldered to each 'south' rail. Of course, DCC could also have been chosen to switch the point blades, using DCC point control modules that typically throw up to 6 points at a time and would allow for various route settings. However I like the idea of using a conventional 'stud and probe' system with a track diagram - it seems more appropriate to the era I'm modelling. The photo (inset right) confirms that the probe can reach the most distant studs comfortably. Meanwhile it is hoped that the photos and explanatory notes (below) will help show what is going on beneath the baseboard...
18V AC SYSTEM - SWITCHING THE POINT BLADES
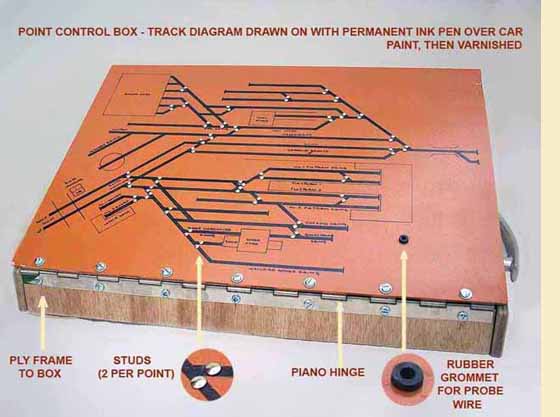 (Left-Right) This is the home-made point control box. Basically a ply box, with a hinged panel made from white PVC-u sheet (commonly used in the sign-making industry). The piano hinge at the lower edge makes maintenance easier. The panel is spray-painted orange to replicate the BR North Eastern Region corporate signage colour of tangerine. When dry I drew the track diagram on with a permanent ink marker and then sprayed several layers of varnish on top, finally drilling 2mm diameter holes where appropriate on the track diagram and pushing Peco studs (actually split pins) through, as can be seen. A larger hole was also drilled to allow the wire of the probe to pass through to one of the two 'power out' screw terminals of the CDU, this hole being dressed with an EPDM grommet to protect the wire from
 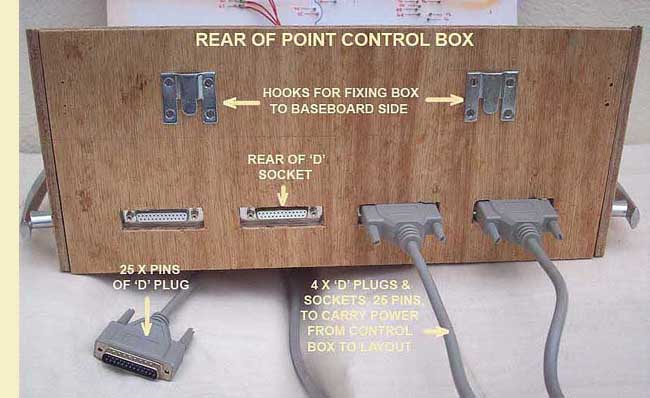 damage. The two handles on the sides of the box make it easier to carry. Power into the CDU is via a Gaugemaster 240V (Mains supply) to 18V AC transformer that will be kept below the layout for safety. The lead from the transformer plugs into a matching socket on the right hand side of the box. The rear of this socket has two pins onto which I have soldered red wires that lead to the 'Power In' screw terminals of the CDU. It's important to ensure that the probe can reach all studs on the track diagram without tension. (Right) The rear of the box shows the cut-outs for two of the four 'D' connections on the left and 'umbillicals' connected to the other two on the right. These lead to matching 'D' connections on the distribution boards under the layout (see photo below), allowing the box to be detached from the layout for transport. It also means I can operate the layout from either side (I've attached hooks to both baseboard sides for this, the two mating hooks on the point control box can be clearly seen).
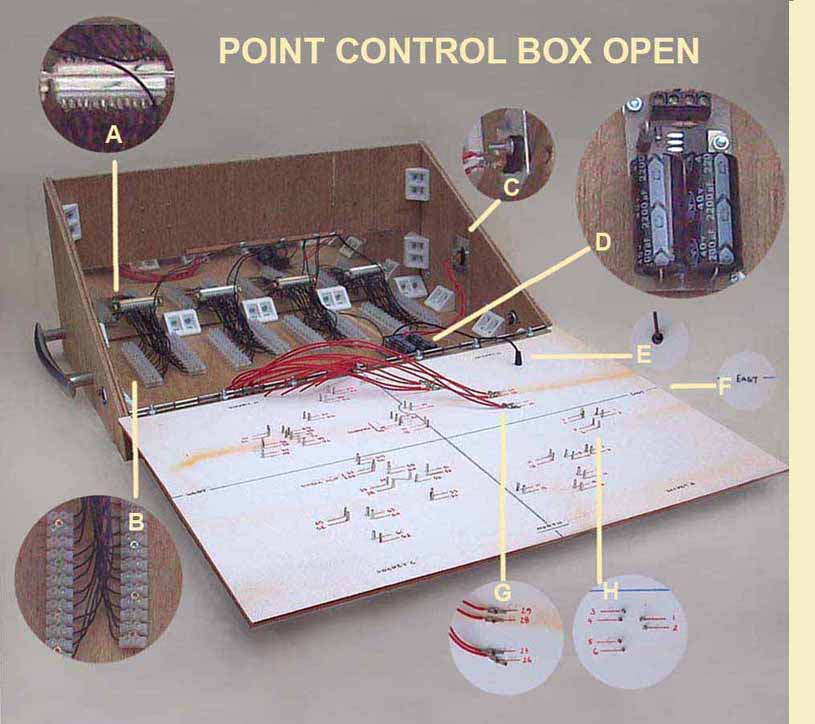 (Left 1) With the point control box open the back of the hinged cover can be seen: note the numbers adjacent to each stud, identifying the point that stud controls. There are two studs per point (one for each 'throw'), except at crossovers where I have linked the two point motors together under the layout so both sets of blades throw simultaneously, thus reducing the amount of wiring necessary and freeing-up space at the 'D' connectors. 'E' shows grommet. 'F' shows my attempt to avoid confusion by orientating board North, South, East and West, also splitting board into 4 sections corresponding to each of the 4 sockets. 'G' shows PECO tags over studs. Wires will link to point motors via D plug at Socket B. 'H' shows the numbering to ensure I connect the correct wire to the correct point motor via D plug....
Inside the box itself, 'A' shows one of the row of four 25-pin 'D' connections. 'B' shows one the four pairs of screw terminal blocks: Each pair takes 24 wires to the pins of the 'D' connections, wire 25 being soldered to the Common return (i.e, the PCB strip running aslong the middle rear of the box). 'C' shows the Power In leads from transformer to CDU. 'D' shows the CDU. The red wires are multistrand. They are more flexible than single-core ('solid') wires and thus more suitable as movement occurs when the panel is opened/closed. Next job is to strip and tin the loose ends of these wires and join them to the screw terminal connector strips. These strips will be labelled 1-12, 13-24, 26-49, 51-74 and 76-99 (numbers 25, 50, 75 and 100 being allocated to Common return). This numbering will be repeated on the distribution boards on the underside of the baseboards (see photo below) so I don't get the connections mixed up. The 'mirror' on the back of the box is actually a thin aluminium sheet glued on after accurately cutting out holes to take the 'D' connectors: they are designed to be bolted to a thin panel, and cannot be fixed direct to thicker materials such as ply. To summarise the above, the flow of power for point control is: 240V AC from mains to transformer: 18V AC from transformer to CDU: one wire from CDU to probe: probe touches selected stud,
 momentarily passing current to solenoid via 'D' connections, umbillicals and distribution board and throwing point blades: Common wire 25/50/75/100 from rear of point motor returns current to CDU and thus completes electrical circuit. The probe really acts as a switch, only forming a circuit when it touches a stud.-
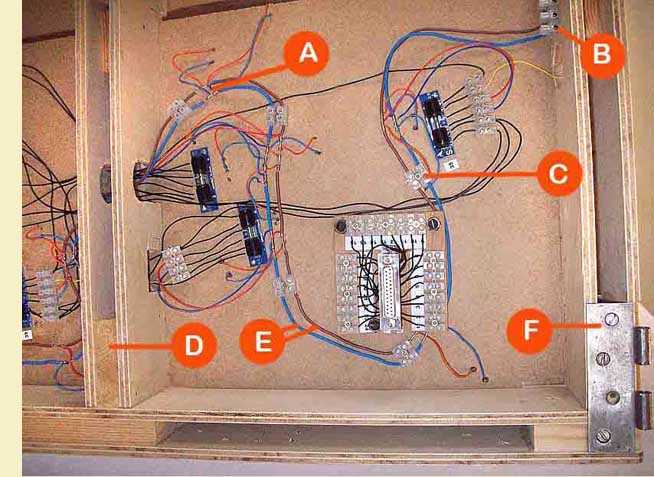
(Right) Click on photo to enlarge. This is the underside of one of the baseboards showing the holes for wiring looms, one of the four Distribution Boards for point control and three SEEP point motors. The baseboard frame 'sandwich' construction can clearly be seen, as well as Distribution Board A which will eventually have black wires leading from it to twelve sets of point motors (those with solenoid numbers 1-24). The number 'A' shows examples of red and blue droppers from rails soldered to brown and blue busbars - 'B' shows the two terminal connectors for two wires from Command Control to layout - 'C' are terminal connectors used as guides-retainers for
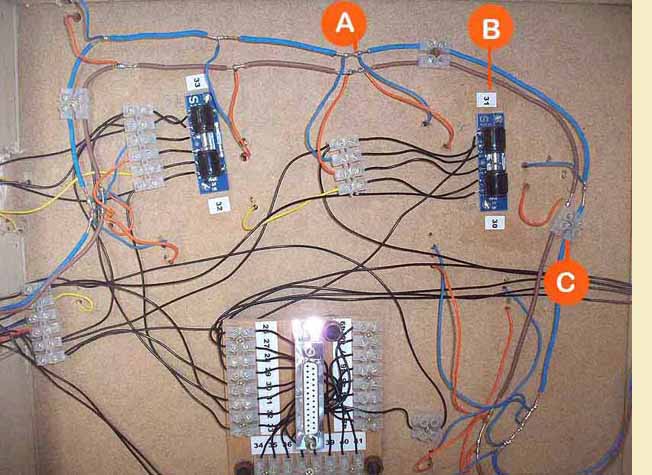 busbars - 'D' Baseboard joint showing lightweight frame 'sandwich' of ply and wood blocks - 'E' shows the brown and blue 'busbars' that carry power from the command controller to the droppers; the droppers carry power from busbars to the rails - 'F' shows the half hinge used for mating with other half of hinge on adjacent baseboard. The thicker brown and blue wires are the busbars for feeding the separate DCC power to the track, the thinner red and blue wires being the droppers which take that DCC power to the rails - see 'section 'DCC - Running the Locos' below in blue text below.
(Above) Close-up of Distribution Board B which routes power to point solenoids 26-49. Solenoids 30, 31, 32 and 33 are visible, connected by black wires to the corresponding numbered
 terminals on the Distribution Board. The number 'A' shows an example of blue and red droppers from rails soldered to busbars - 'B' shows the labelling of each solenoid to aid identification - 'C' shows the brown and blue 'busbars' in guides.
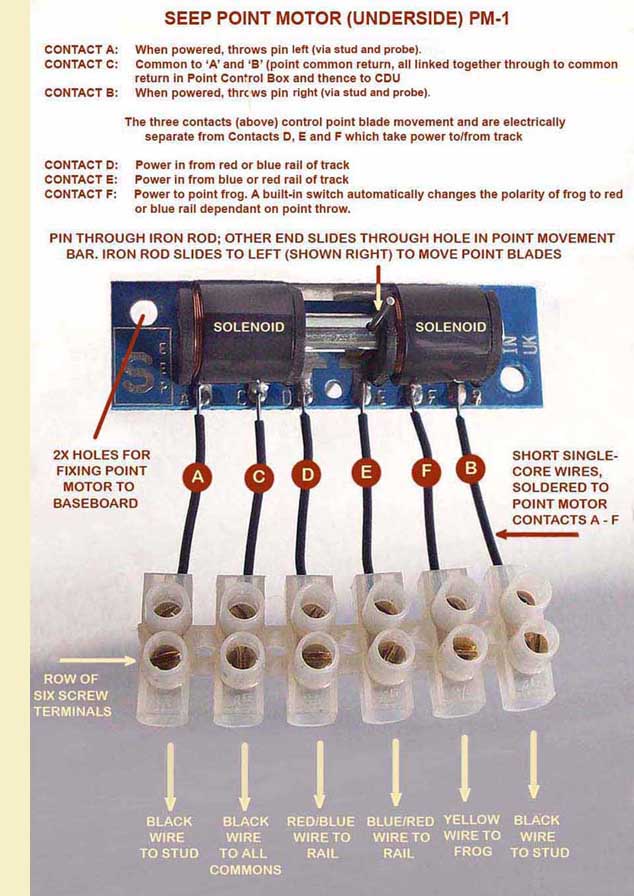
 (Right) Close-up of a SEEP point motor showing short wires soldered to six contacts labelled A-F. The other ends of the wires are screwed to terminal connectors. A and B link up to the appropriately-numbered terminals from one of the Distribution Boards, C is the point Common (see section below) for contacts D, E and F (D, E and F are electrically separate to A, B and C).
DCC - RUNNING THE LOCOS.
The DCC system operates the locos on the layout as well as their lights (where fitted). With DCC all track is live at all times, so locos/carriages can keep their lights on even when stationary and their engines can be heard to idle, whistles/horns can be sounded, etc, Yes, it's now even possible to have realistic sound systems in N Gauge with DCC but this is probably not a bridge I'll choose to cross, on the grounds of cost!
Two wires lead from the Command Controller to the baseboards, these wires are then connected to the busbars. Dropper wires are also connected to the busbars and feed the power to the track and thus the loco motors. Experienced DCC users advise that busbars should be of substantial cross-section, to avoid voltage drop which can have 'interesting' side effects on digital operation of locos. I use solid-core mains wire stripped from twin core and earth cable. It's also advisable to keep busbars to a length of less than 25 feet/8 metres, otherwise boosters may be required. The busbars snake around the baseboards, to enable the droppers to be kept as short as possible. As the busbars are solid-core they retain their shape when bent and so only need to be fixed to the baseboard with a few screw terminal connectors (see photos above).
Droppers are soldered to the underside of rails, to keep them hidden from view. Also I solder droppers to every separate piece of rail so I don't rely on the mechanical connection of fishplates as an electrical connection. My dropper wires are multi-strand and are soldered to their matching busbar. This means stripping the insulating sleeve from the last 25mm/1" or so of the dropper and from a nearby section of the single core busbar, twisting the multistrand wire to prevent fraying, then wrapping that wire around the newly-exposed busbar wire before flooding the connection with solder. 'Scotchlok' connectors, as used in the automotive industry, are popular in the USA and are being increasingly used here too. However, although they offer an alternative non-soldered connection and can be easy to use, they are only reliable if the correct combination of busbar and dropper sizes are chosen for the connector, and if both sets of wire are multistrand. They also work out more expensive than soldering!
Dropper wires are also soldered to each point (or turnout if you want to be technically correct!) - remember a point is a piece of track! To feed DCC power to a standard two-way point I need three droppers - one red and one blue (as for a plain piece of track) at the 'toe' end of the point, plus one yellow attached to the common crossing (the 'vee' or the 'frog' in model railway terminology) as I modify my Peco points to make them more reliable. As this modification is quite involved I feel this requires a section of its own - see the brown text in section below.
MODIFYING PECO POINTS FOR BETTER OPERATION
So why did I choose to modify PECO points? Well, although they are DCC suitable they were designed for DC analogue operation, and this link gives several good reasons why they should be modified. I didn't like the idea of relying on the contact of the point blade with the appropriate stock rail as a means of powering the common crossing ('frog' in model railway parlance). Nor did I like the possibility of a short-circuit being caused by a metal wheel bridging the gap between an open point blade and an adjacent stock rail of opposite polarity - in DCC a short circuit would cause the whole system to shut down: a bit embarrassing at an exhibition and a blooming nuisance to boot.
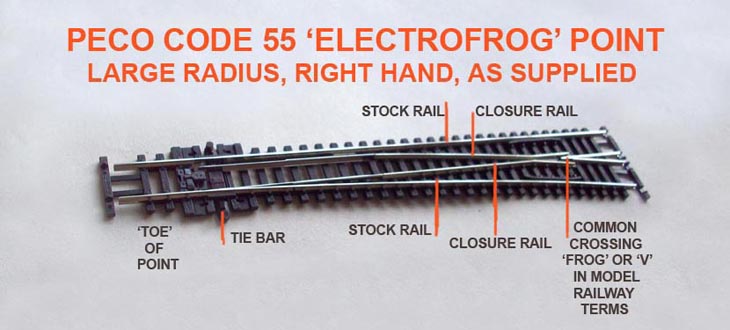
Perhaps at some time in the future PECO will modify their tooling to take the following extra work (which invalidates the manufacturer's guarantee) away, but until that happy event occurs this is what I do to make the PECO electrofrog N Gauge point, in all its forms, more DCC suitable.
1. Using a slitting disc in a minidrill, isolate the point frog by cutting through the two closure rails about 2 sleepers back from the tip of the frog. Ensure they are both cut all the way through!
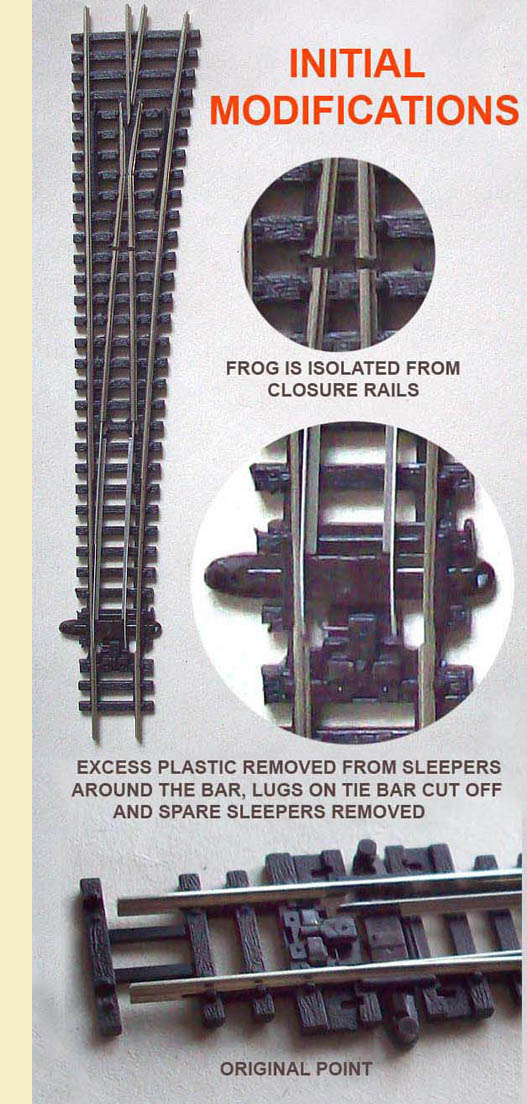 2. Turn the point upside-down, then remove the plastic webbing from the two closure rails and the two adjacent stock rails between two sleepers, thus exposing the base of the four rails. This must be done somewhere between the cut just made in (1) above and the hinge that allows the point blades to move.
3. Clean the base of each of the four newly-exposed rails as in the soldering guide above.
4. Using pre-tinned wire (available from any electrical wholesaler) cut two short lengths just long enough to bridge each stock rail and its adjacent closure rail. Solder each wire onto these two rails accordingly. Each stock rail is thus now electrically bonded to its nearest closure rail and no longer depends on point blade contact for its power.
5. For a standard point cut three dropper wires of the appropriate colour (one yellow for the frog, one red and one blue for the droppers) to length. Strip one end of each wire. As I use multistrand I now tin the exposed end of each wire. Bend each stripped end 90 degrees.
6. Determine which side of the point will be the red side and which the blue. This will depend on which way round the point is to be installed on the layout. I have red as the north, blue as the south and this prevents basic errors (usually). Clean up the base of the two rails at the toe end of the point and tin with a thin coating of solder. Slide a metal fishplate onto each of those two rails and solder the fishplate to the rail. Clean up the base of each fishplate, tin each fishplate and then solder the bent end of the appropriately-coloured wire to the fishplate. Note: I used to solder the wires directly to the rail but often found I then couldn't slide the fishplate on!
7. Now clean up and tin the ends of the two frog rails as close as possible to the plastic sleeper furthest away from the frog. Solder the bent end of the yellow wire across both frog rails, ensuring that there is nothing to prevent the nylon insulating fishplates from sliding on correctly later.
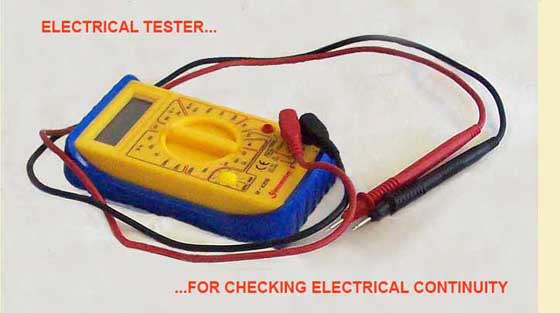
8. Using a multimeter on its resistance setting (Ohms) now check all connections are electrically good. Also check that there is no electrical continuity where it shouldn't be. This should eliminate any chance of stray short circuits or electrical failure when the point is installed on the layout.
Hopefully the accompanying photos (to follow) will make all this clearer. In effect each modified point now works electrically in exactly the same way as a handbuilt point would. After a couple of points the task gets easier and quicker, but every step must be meticulously followed, and it is laborious if you try to modify alot of points in one sitting.
As I said earlier, it would be easier for the modeller if PECO modified their production process but this is probably easier said than done. I would be happy to pay a reasonable premium for such points. By the way, the above steps would also improve a point to be operated on DC analogue control, it's just that DCC makes it an even more beneficial improvement. All that remains now is to install the point on the layout, but
 a hole must be drilled in the baseboard for each of the three wires to comfortably slide through. The red and blue wires will then be connected to the SEEP point motor terminals marked 'D' and 'E' depending on the point motor's orientation: the yellow wire will be connected to the terminal marked 'F', all three via the appropriate screw terminal on the terminal block.
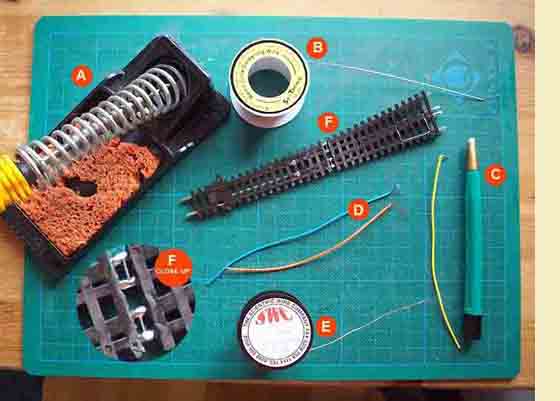
(Above Left) The tools used for wiring modifications includes: 'A' - soldering iron, stand and damp sponge - 'B' Resin-cored solder wire - 'C' Fibreglass Pen - 'D' Blue, red and yellow multistrand wire...one end of each stripped, tinned and bent right angle - 'E' Tinned copper wire used for bridging stock rail and closure rail. The reference 'F' is a close-up of copper wires bridging stock rails and closure rails.

BALLASTING THE TRACK
Now that I've installed half of the layout's points I've been busy with the monotonous but important tasks of painting and ballasting. This has the benefits of holding the track down to the baseboard and improving the appearance of the track. Track painting is straightforward: I mix enamel paints into a suitable colour, thin the mix down with white spirit and then paint the rails and sleepers. I think it's important to paint the sleepers as the plastic is shiny. I don't use 'rail rust' or similar colours: to my eyes these are only sauitable
 for rails that are intended to look newly-laid. Use colour photos of the area your model is based on as a guide.
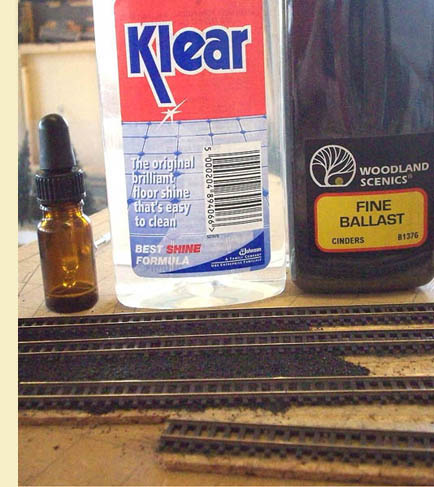
As with most of the North East's secondary/branch lines, track at Blyth was mainly ballasted in cinder ash. I'm using Woodland Scenics cinder ballast but this is overscale for N scale even though it's the finest grade available. It's not too noticeable to the naked eye.
To glue the ballast down I'm not using the conventional diluted PVA: there have been reports in the model railway press of the long-term effects of PVA on wiring and rails, and it does discolour ballast. Instead of PVA I'm using Johnson's Klear - a floor polish which does a good job of fixing ballast to track and track to the baseboards. It doesn't discolour ballast either. The snag is that due to our infamous Health & Safety rules this product can no longer be used for its original purpose, and is now offered in a weakened formula that precludes its use for ballasting. I've got one of the old batch, but if you want to find something similar to the old formula try the Web - I understand a British company now make a product similar to the old formula, intended for railway modellers.
Ballasating in itself is a simple but time-consuming task. I 'pour' the ballast over the track and brush it gently so the ballast is just below the top of sleepers. I also ensure the moving parts of points and check-rails, etc., are kept clear. Johnson's Klear is then dropped carefully onto the ballast using a pipette and allowed to harden (at least 24 hours). Any stray ballast can be removed when dry and hard with a cocktail stick. Loose ballast is then vacuumed up but I put a stocking over the nozzle to collect the loose ballast so it can be re-used.
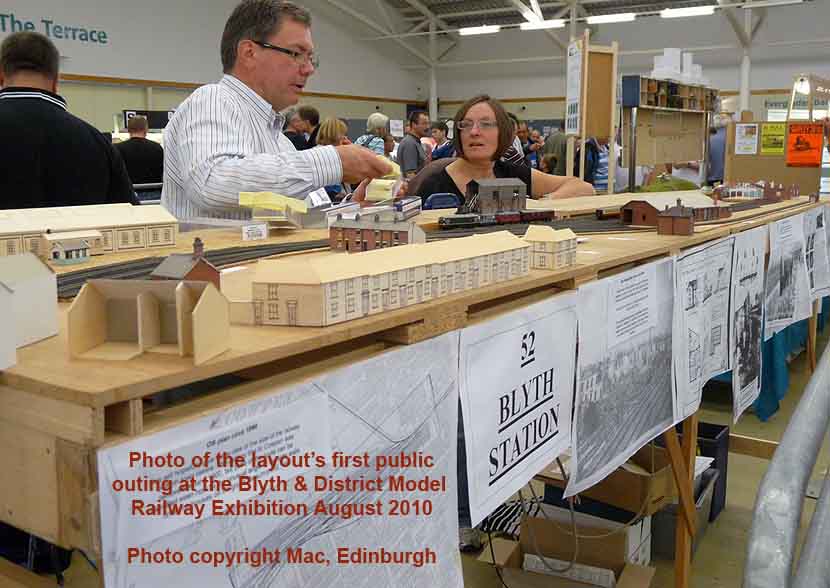
Since the Blyth & District Model Railway Exhibition in August 2010 (above) I've been concentrating on laying track on the 'upper' level of the layout, with the aim of completing this before its next showing at South Shields Salvation Army Model Railway Exhibition at Wawn Dtreet, South Shields on Friday 11 and Saturday 12 February 2011.
As the photos show (to follow) this is going quite well, with virtually all trackwork complete on one of the baseboards. This was slightly delayed due to the need to raise the track level between the coaling stage and Turner Street bridge: there was an un-prototypical dip in the track here which I only spotted when a wagon tested on the first new bit of track rolled into the dip! I used 1mm thick cork sheet to correct my error.
I still have a lot of pointwork to install around the engine shed area, and the turntable is still some way off being anything other than a pen mark on the baseboard! I'll be quite relieved to complete the tracklaying: it's beginning to feel like Groundhog Day as the upper level has around 25 points, all of which had to be modified as decribed previously. I still have to install the point motors under this track, lay 'busbars' and solder droppers from the track to the busbars.
The need to ballast the new track fills me with dread...So that just about brings things up-to-date with latest developments on the layout (at the beginning of December 2010). I am hoping to complete all of the above before mid-February, but it is a big task. 'To follow' after this stage are the retaining wall parallel to the station platform and the platform itself. I also need to approach a few specialist companies that may be able to produce the columns to support the platform canopy: an early attempt in resin by one company was unsuccessful due to the small diameter of the columns in N scale - I need to look at other materials that can be cast but retain structural strength. Watch this space... I've installed the bridge base across Turner Street: this is scratchbuilt in layers of plasticard, the top layer between, and both sides of, the single line being a thin sheet onto which I embossed rivets using a scriber. I was surprised how easy (but boring) this was. The bridge abutments are Ratio plastic sheets from their Builder range - thick but quite soft embossed plastic similar to that used to simulate the corrugated iron on the coaling stage. I'll eventually make the bridge sides, in a similar way to the bridge base. On the real thing, during the 1950s and up to 1964, the bridge sides carried an advert 'Evening Chronicle - Best For Local Sport' which consisted of individually-applied letters in a non-standard typeface: I'm hoping to have these etched for me in nickel silver as I can't think of any other way to produce them accurately.
MARCH 2011 UPDATE
Well, it's now mid-March 2011, so what progress have I made since the last update of early December? In brief, not as much as I had hoped! This is mainly due to the very cold weather which stopped me working in the Clubrooms (where the layout resides) for a good 6 weeks. Even now the Cubrooms are still cold and rainwater still pours in through the roof, there is no central heating and we rely on a combination of ineffective gas- and diesel-powered heaters to warm us hardy souls. It's hardly conducive to modelling, but things may change - watch this space!
I've just finished laying the track on the high-level line behind the station, and have been painting and ballasting it as with earlier sections. I haven't yet connected the droppers to busbars, or installed point motors: these tasks will wait until I disassemble the boards again as it's much easier with the boards standing on end. A start has also been made on the final section of tracklaying on the other board, towards the engine shed and turntable area. I'll be happy when tracklaying and wiring is finished, so I can concentrate on scenic work and stock building. So what else has happened in the past four months?
THE FIDDLE YARD.
The layout was exhibited at the Salvation Army Exhibition in South Shields in February 2011: in preparation for that I decided to build the fiddle yard prior to the exhibition. This enabled trains to be run to scale length for the first time, and for trains to run off the viewable part of the layout realistically - I want the paying public to see trains go 'off stage' just past the site for the level crossing, and not to see me shuffling trains around.
The fiddle yard baseboard (photo to follow) is 3'6" (1.075m) long to accommodate the longest train I intend to run (a loco, 2 brake vans and 20 x 21 tonne hopper wagons). This has two legs at one end and 'piggybacks' onto the adjacent main board, connected by my usual system of door hinges. The frame and the baseboard top were both made from ply, for lightness. I then constructed a 'cassette' (photo to follow) from ply (for the top) and softwood (for the frame) which sits on top of the baseboard and carries two tracks. A block of wood screwed and glued to the far end of the cassette stops errant trains running off the end. The other end of the cassette has tracks on a reverse curve due to the curve of the track going off the layout. This has led to the cassette being 8" (0.2m) wide (and, of course, 3'6" long). I intend to make a further three identical cassettes though time, my intention being to drive a train from the main layout onto a cassette, remove that cassette complete with train, and replace it with another cassette containing a different train ready to be driven out onto the layout.
I gave quite a lot of thought to how I would provide power to the two tracks on the cassettes: in the end this has proven to be simple. I popped into Maplins and came out with matching plugs and sockets, in red and blue. I only needed to buy one red and one blue plug, and these are permanently connected to the main layout busbars. I bought four sets of red and blue sockets, one set for each cassette. These are connected to their respective busbars under the track on the cassette - the photos will make this clearer. All I have to do is push the red plug into the red socket, blue into blue, and hey presto the cassette is powered!
DISPLAY BOARDS.
To hide the fiddle yard from view I decided to construct a set of display boards (photo to follow) to show photos and information about the station. I wanted an overall erected height of 6'6" (2m) but I had to make two identical boards, each 3'6" (1.075m) wide and 3'3" high, so they fit into my car and are easier for me to carry. Again they are made from plywood sheet for lightness, and are painted matt black.
They bolt to three 5' (1.524m) long slotted 'U' aluminium channels (designed for use as a shelving system), these 'U' channels being bolted to the fiddle yard frame. The photos and plans I wish to display are laminated to keep them clean, and then Velcro strips fix them to the display boards. This also allows me to change the photos I wish to display, for variety. At the exhibition I was pleased to see many visitors show a lot of interest in the photos and plans on the display boards - they complement the adjacent layout nicely and give visitors a lot of the information they would like. This gave me more time to talk with them on aspects of modeling as well.
The final bit of layout dressing that was completed just before the exhibition was the curtain front (photo to follow) to the layout itself. This hides the baseboard legs and all the paraphernalia that accumulates under the layout. It's a 10' (3.1m) length of blackout fabric, again affixed with Velcro strips.
WHAT ELSE?
One of the many good things about exhibiting a layout of a real location is the number of people who provide just that extra little bit of detail on obscure, but interesting and useful, aspects of the prototype. At South Shields I met Colin Oakley, who as a young boy lived in the maisonettes which overlooked the goods warehouse. Colin very kindly gave me copies of a couple of photos taken after closure to passengers, and he was able to confirm that the goods warehouse door at the west end of the building was unpainted - I had always assumed it was painted BR (NER) Oriental Blue like the door at the east end. A minor detail, perhaps, but not something evident on any photo I had seen before. Colin looked through my photo collection and one of my photos brought back memories for him of an obscure brick hut, overlooked by the maisonettes that he saw every day. This motivated me to build the hut (I'd have got round to it eventually...) and the result can be seen in the photo (to follow). I rustled this up in one day, sitting spare at work - that's fast for me. The only photo I have showing the real hut, in a derelict state in 1969 with the maisonettes in the background, can be seen for comparison (photo to follow). I've also made the retaining wall that ran parallel to the station platform, one of the things that was on my 'to do' list on my last update (photo to follow). This is a strip of thin ply with Slaters brick plasticard sheet glued on. It will eventually have a plasticard strip on top, to replicate the stone capping of the real thing.
Talking of walls, I've made a start on the wall that separated the railway from Delaval Terrace. This ran from the Station Master's house to Turner Street and was constructed of brick for most of its length, changing to stone near the weighbridge - the stone section was of Blyth & Tyne Railway origin, having been built when they replaced the first station in 1874. The North Eastern Railway (NER) constructed the brick section in 1894, and this is the section I've constructed first. This uses four laminations of brick plasticard to achieve the 3D panelled relief required. There are 36 panels (photo to follow). When finished, the wall will be around 5' (1.524m) long but less than 1" (25mm) high, and will be very visible at it's at the front of the layout.
WHAT NEXT?
I'm now concentrating on completing the ballasting of track I've laid to date. This is in anticipation of the layout moving to new Clubroom premises: the floor polish used in fixing the ballast in place also glues the track down, and will reduce the risk of damaging the track during the move. Having a specific time to complete a task by definitely speeds up progress!! When the Club is up and running in the new premises I'll then need to focus on what can be achieved prior to the next exhibition in August (info to follow). This will hopefully include construction of the main station platform, completion of track laying, ballasting and electrics. Quite how much will be achieved depends on how long it will take to complete the move.
So, that brings the story of recreating Blyth Station in miniature up to date. I continue to have problems finding anyone who can make the platform canopy support columns: about four months ago I e-mailed a quotation request to at least 25 companies specialising in 3D modelling for architects, but only two gave me the courtesy of a reply - both negative. I may resort to just using brass section: plastic would be too flimsy and resin castings are too brittle and lack detail. Ho hum, such challenges help me to learn more (I keep telling myself).
Polite notice: All text and photographs are protected by copyright and reproduction is prohibited without the prior consent of the © owners. If you wish to discuss using the contents of this page the email address is below. Please note - this is not a 'clickable' mail-to link via Outlook Express. You will have to email manually.
ed.orwin@hotmail.co.uk
dheycollection@ntlworld.com


